In this post, we’ll discuss how to create custom directive. This is a big topic so I will be discussing in coming couple of posts.As a whole, this is ninth post in series of Learning AngularJS and I hope you are enjoying this series. The link of my earlier posts in the series are below
Learning {{AngularJS}} with Examples–Part 1
Learning {{AngularJS}} with Examples–Part 2
Learning {{AngularJS}} with ASP.NET MVC – Part 3
Learning {{AngularJS}} with ASP.NET MVC – Part 4
Learning {{AngularJS}} with ASP.NET MVC – Part 5
Learning {{AngularJS}} with ASP.NET MVC – Part 6
DataBinding in {{AngularJS}} – Part 7
Data Binding in {{AngularJS}} : Under the hood – Part 8
So let’s come to topic and start from the basics.
What are Directives?
From Angular’s documentation “At a high level, directives are markers on a DOM element (such as an attribute, element name, comment or CSS class) that tell AngularJS’s HTML compiler ($compile) to attach a specified behavior to that DOM element or even transform the DOM element and its children.”
So anything that we write in HTML that is handled by Angular are Directives like {{}}, ng-click, ng-repeat etc.
How Directives are handled?
Directives provides us a capability to have more control and flexible way to rendering the html. As we know these are not standard HTML attribute so browser doesn’t understand it. Angular chips in between and reads all the directives and process them to emit the browser readable HTML. So what is the process of handling directives? I already discussed that in my last post, but I am including it here briefly.
 So there are two steps involved here: Compiling and Linking.
Type of Directives
There are four types of directives. These are
- Element directives
- Attribute directives
- CSS class directives
- Comment directives
Element Directives – Element directives are like HTML elements as
<myElementDirective></myElementDirective>
Attribute Directive – Attribute directives are which can be added an attribute over an element as
<div myAttrDirective></div>
CSS class directives– These directive can be added as an CSS class
<div class="myAttrDirective: expression;"></div>
Comment Directives– Comment directives is represented as
<!-- directive: myCustomAttrDirective expression -->
How to create a custom directive
One of the key benefits of AngularJS is that apart from its built-in directives, it allows us to write our own custom directives so that we can render the HTML on browsers based on our specific requirement. Angular provides us a simple syntax to create our own custom directive.
var myElementDirective = function () {
var myDirective = {};
myDirective.restrict: 'E', //E = element, A = attribute, C = class, M = comment
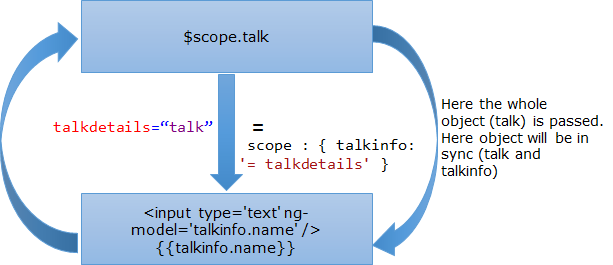
myDirective.scope: {
// To provide scope specific for that directive },
myDirective.template: '<mdiv>This is custom directive</div>',
myDirective.templateUrl: '/myElementTemplate.html',
// use either template or templateUrl to provide the html
myDirective.controller: controllerFunction, //custom controller for that directive
myDirective.link: function ($scope, element, attrs) { } //DOM manipulation
}
The brief description of each property as
| restrict |
Defines the type of directive. Possible values are E (element), A (Attribute), C (Class), M (Comment) or any combination of these four |
| scope |
Allows us to provide a specific scope for the element or child scopes |
| template |
This contains the HTML content that would be replaced in place of directive. It also could contain any other angular directive |
| templateUrl |
Allows us to provide the URL of the HTML template that contains the actual html content similar to above. Set any one of the two. |
| controller |
controller function for the directive |
So we got the details about creating a custom directive. But the next question is – How to register it? As we discussed on one my earlier posts (part-2) that Module works as container in AngularJS so the same applies here as well. It means we need to register it with module as directive. We’ll see that coming example.
Let’s create an example
So I am going to create a simple element directive as
var myangularapp = angular.module("myangularapp", []);
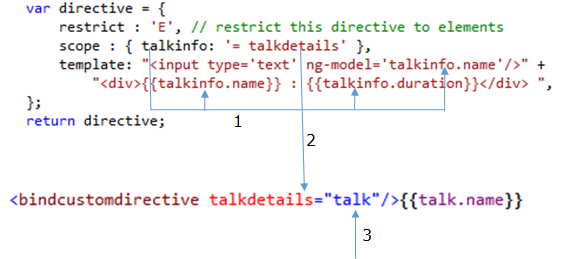
myangularapp.directive('myelementdirective', function () {
var directive = {};
directive.restrict = 'E'; //restrict this directive to elements
directive.template = "Hello World using Custom Directive";
return directive;
});
and HTML is
<body ng-app="myangularapp">
    <myelementdirective></myelementdirective>
</body>
No when we run this page, it will appear as
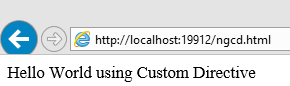 So here we can see the element myelementdirective is replaced with the text. In this example, I have used only few properties that I discussed.
So here we can see that this is an element directive as restrict is set to E (Element). restrict property can be also set as any combinations of E,A,C,M like EA or EAC. If we set it as EA then compiler will find myelementdirective as an element or attribute and replace it accordingly.
We can also use templateUrl instead of template. templateUrl will pick the content of the file and use it as template.
Now, Let’s understand the flow of it working
1- When the application loads, Angular Directive is called which registers the directive as defined.
2- Compiler find out any element with the name myelementdirective appears in the HTML.Here, It finds at one place.
3- Replaces that with the template.
So looks simple. Right!! Let’s see another example
    myangularapp.directive('myelementdirective', function () {
            var directive = {};
            directive.restrict = 'E'; //restrict this directive to elements
            directive.template = "Hello {{name}} !! Welcome to this Angular App";
            return directive;
    });
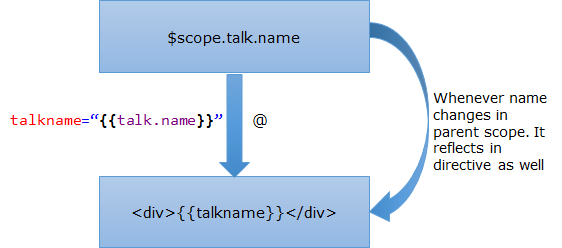
So here we used an interpolate directive {{}} in the template and used name. So we need to provide the value for this. So let’s add a controller to handle that
    myangularapp.controller("mycontroller", function ($scope) {
        $scope.name = 'Brij';
    });
Now when we run the application, Would it work?
 So it did work. But in this case, what would be the flow?
As I mentioned earlier that there are steps involved while rendering a page. Compiling and linking. All the data population takes place in linking phase. So during compilation phase it replaced the directive and in linking phase the data got populated from the scope. So earlier steps would be there, just one more steps would be inserted in between 2nd and 3rd.
Using Transclude
This word may look complex but it provides a very useful feature. Till now we have seen that custom directive are just replaced by the template that we provide while creating custom directive but there could be some scenario where we donot want to replace the whole html but only some part of it. Like say I want that the text that is wrapped by the custom directive should not get replaced but only element part. Didn’t get? Let’s see pictorially
Say I created a custom element directive as myCustomDirective and the template provided for it as <div>Some custom template text<div>
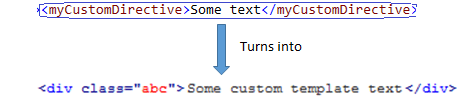
In case of transclude

Note – Here I changed the template as <div ng-transclude>Some custom template text</div> to get the transclusion working.
So in the above pic, we can see that the text is not replaced while in case normal directive the whole template replaces the directive.
Now we understood the transclusion so let us see what all we need to do to use it. There are two steps
1- Set the transclude property to true while creating directive.
2- We need to inform Angular that which part contains the transcluded html that’s why for transclusion example, I changed the template a bit (Refer Note above)
Hope you have enjoyed this post. In the next post, we’ll some more interesting feature of custom directives. Stay tuned.
Happy Learning
Brij