This is the tenth post in the series of AngularJS (Get the list of all previous posts, click here) and this post in the continuation of last post where we have discussed the basics of custom directive (I will recommend to read last post before continuing, Click here to see previous post) but the real value of a custom directive, if it is reusable and can be independently used at many places. If you are using the parent scope directly in your scope then it wont be reusable. One more side effect, if the parent scope gets updated then your custom directive will also be affected even if you don’t want. Not clear? Let’s see an example
var myangularapp = angular.module("myangularapp", []);
myangularapp.directive('customdirective', function () {
    var directive = {
    restrict : 'E', // restrict this directive to elements
    template: "<input type='text' placeholder='Enter message...' ng-model='message' />" +
        " Your Message : {{message}}"
    };
    return directive;
});
I have created a directive where user is allowed to enter some message as it and created multiple instances of same directive as
<customdirective> </customdirective>
<customdirective> </customdirective>
<customdirective> </customdirective>
Now let’s see it running
 Here we can see that even we are changing the values in one directive but its getting reflected in all the directives. It is because all are accessing the same scope. Certainly we don’t want this. This problem can be resolved using isolate scope.
What is isolate scope ?
The problems that we discussed above, can be resolved by isolate scope. We can isolate the scope easily that is used in the custom directive. To add isolate scope, we need to add the scope property while defining the directive. It also makes sure that parent scope is not available to the custom directive.
But now the question arises how will the directive interact with the outside world? Because the directive cannot be useful if it works in complete isolation. To handle it, Isolate scope provides us three options to communicate to isolate directive that is also known as Local Scope properties. These are
 Let’s discuss each in details
@ or @attr : @ provides us capability to pass a value to custom directive in string format. I have made the string format as bold because I wanted to highlight it, here we cannot pass an object. If you pass an object it will be treated as string format only and accordingly displayed. Also, it works like one way binding it means if the data changes in parent scope, then it reflects in the directive as well as
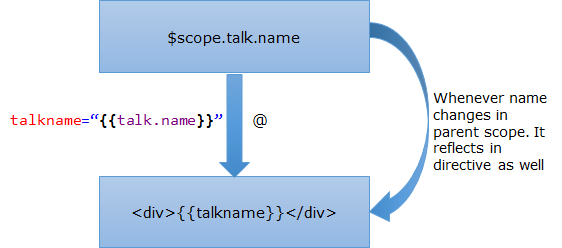 So here we find that a change takes place in parent scope, it reflects in directive itself but vice versa is not true. If it gets changed inside directive, parent scope does not get affected. Now, How to create the directive?
 So here we have created a directive and used it. The details of three points (in pic) are
1- talkname is a property in the isolate scope and it is only accessible in directive itself
2- @talk means that this would be the attribute name in the custom directive that will be used to communicate. We can also write scope : { talkname: ‘@’ }, in this case, talk and talkname both would be same. In this example, I have used different name for better understanding.
3- This is passed from parent scope. As I mentioned in earlier section, that if parent changes then it would reflect in directive as well.
The complete code is as
<script language="javascript" type="text/javascript">
    var myangularapp = angular.module("myangularapp", []);
    myangularapp.controller("mycontroller", function ($scope) {
        $scope.talk = { name : 'Building modern web apps with ASP.NET 5', duration : '60m'}
    });
    myangularapp.directive('attrcustomdirective', function() {
        var directive = {
            restrict : 'E', // restrict this directive to elements
            scope : { talkname: '@talk' },
            template : "<div>{{talkname}}</div> ",
        };
        return directive;
    });
</script>
</head>
<body ng-app="myangularapp" ng-controller="mycontroller">
    <attrcustomdirective talk="{{talk.name}}" />
</body>
Now let’s move to another type.
= or =attr :
Unlike the @ property which allows us to pass only string value, it allows us to pass the object itself to directive. And the data also gets synced in parent and child scope like two data binding. If the data changes from inside the directive it reflects in parent scope.
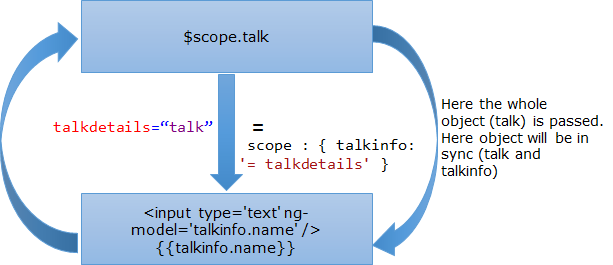 Here talk (whole object) is passed in directive and assigned to talkinfo. Now whether the talk or talkinfo gets updated both remains always in sync.
 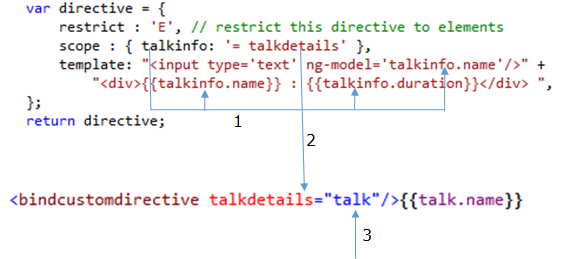 We can see from above that how the directive got created with = and its uses. The details of three points (in pic) are
1- talkinfo here is the object that that got received via talkdetails. You can see, I have accessed the value of talkinfo three times via its properties.
2- talkdetails is attribute name that is used to pass the object via directive. Similar as earlier if we don’t provide the attr as scope : { talkinfo: ‘=’ } then the attribute name will be talkinfo only.
3- talk is the scope object that is assigned to talkdetails.
The complete example will be as
<script language="javascript" type="text/javascript">
    var myangularapp = angular.module("myangularapp", []);
    myangularapp.controller("mycontroller", function ($scope) {
        $scope.talk = { name : 'Building modern web apps with ASP.NET5', duration : '60m'}
    });
    myangularapp.directive('bindcustomdirective', function() {
        var directive = {
            restrict : 'E', // restrict this directive to elements
            scope : { talkinfo: '=' },
            template: "<input type='text' ng-model='talkinfo.name'/>" +
                "<div>{{talkinfo.name}} : {{talkinfo.duration}}</div> ",
        };
        return directive;
    });
</script>
</head>
<body ng-app="myangularapp" ng-controller="mycontroller">
    <bindcustomdirective talkdetails="talk"/>{{talk.name}}
</body>
Let’s move to last Local scope property.
& or &attr
This is the third and last isolate local scope property. It allows us to wire up external expression to the isolate directive. It could be very useful at certain scenario, where we don’t have details about the expression while defining the directive like we want to call some external function when some event occurs inside the directive based on requirement.
 In the above pic, we see that we have function with name method that is passed to directive as via the attribute named expr. Let’s see how do we create the directive and how different property and attributes are co-related.
 In the example above, I have used two directives & and @. @ is just used to support this example. Although you must have understand the three points that I have used in the above pic as it is similar to earlier but let me explain it once more in this context. In this example, we are updating an object that gets updated and reflected in the directive as well because of one way binding behavior of @ local scope property
1- method is the property of inner scope here so it is used to access the passed method
2- expr is the attribute name that is used in the directive to pass the expression or defined method. Behavior would be same as earlier local scope property if we just write scope : { method: ‘&’}
3- UpdateData() is the method name that we want to pass in the directive and it is defined as part of parent scope.
4- This value gets updated when we click on Update Data button that calls UpdateData() method which updated the object Talk.
Let’s see the complete example.
<script language="javascript" type="text/javascript">
    var myangularapp = angular.module("myangularapp", []);
    myangularapp.controller("mycontroller", function ($scope) {
        $scope.talk = { name: 'Building modern web apps with ASP.NET5', duration: '60m' }

        $scope.UpdateData = function () {
            $scope.talk = {
                name: 'Working with AngularJS',
                duration: '45m'
            };
        };
    });
    myangularapp.directive('expcustomdirective', function() {
        var directive = {
            restrict : 'E', // restrict this directive to elements
            scope : { method: '&expr', talkname : '@'},
            template: "<div>{{talkname}}</div> <input type='button' " +
                "ng-click='method()' value='Update Data'/> ",
        };
        return directive;
    });

</script>
</head>
<body ng-app="myangularapp" ng-controller="mycontroller">
    <expcustomdirective expr="UpdateData()" talkname="{{talk.name}}" />
</body>
Hope you must have got good idea about local scope properties in isolate scope and will be able to decide easily that what to use. Do share your feedback and questions.
To navigate to previous and next post of the series, use the links at the bottom of the post.
Happy learning
Brij

Pingback: Few ways to pass values to a Function in Isolate scope : {{AngularJS}} – Part 12 | Code Wala
Pingback: User Name availability check with AngularJS, ASP.NET MVC and ASP.NET Web API | Code Wala