Hosting ASP.NET Core Applications on IIS : In-process hosting

In my previous blog post, I discussed a brief history about ASP.NET Webforms/MVC applications and its deployment to IIS. Then we took a look in the new framework ASP.NET Core which was introduced keeping in mind the performance and cross platform readiness. As performance was one of the key drivers, they introduced entity framework core and all thenew web server named Kestrel. You can read the blog post here.

Hosting ASP.NET Core Applications on IIS – A Detailed Look

We discussed about ASP.NET MVC Core 2.1 and discussed some internal details about its deployment on IIS as a reverse proxy (which is recommended), and also took a look on using Kestrel as an Edge Server. Although Kestrel is matured enough to be used as an Edge Server but still IIS is considered better option. We also saw, how ASP.NET Core requests are handled by IIS. We need to install the .NET Core Hosting bundle (download here) which adds a module named ASP.NET Core Module  (ANCM). ANCM is responsible to route the asp.net core request to Kestrel.

With ASP.NET Core 2.2, Microsoft introduced In-process hosting. This model allows us to host the asp.net core 2.2 directly inside the worker process (w3wp.exe) which is similar to earlier ASP.NET version. Let’s take a pictorial view

We can see that there is no dotnet.exe is involved here in the second part. All the components ANCM, CoreCLR and application code are loaded in same worker process.

To use the latest feature, we need to install the latest 2.2 bundle (download here) which installs the upgraded version of ANCM also referred as ANCMv2. After installation, both the modules can be seen in IIS modules section as

Why new version of ASP.NET Core Module (ANCMv2)?

Earlier the idea with ANCM to use IIS as a reverse proxy and leverage Kestrel as a backend web server (as it was not hardened enough as an edge server) but as Kestrel got all the required enhancements, MS reworked on ANCM so that IIS can be used another platform to host asp.net core applications without the need of Kestrel. ANCM got redesigned and divided in two components, a shim and a request handler.

     Shim – As the name suggests, it is a very light weight component which is continue to be installed as a global module via bundle which just work as an interface between IIS and request handler.

   Request Handler – Request Handler is now an independent component which does all the work and can be updated via nuget. We can have multiple versions of request handler side by side. It means we can have multiple application using its own request handler.

With earlier ANCM, it was available as global singleton module which is shared by all the application which is a major bottleneck in releasing newer versions as it has to support every application. With the new architecture, we also get better process management, performance enhancements and easy updates via nuget.

We have so many benefits with the new model however we have one limitation – one application pool can only host only one application (In ASP.NET Web Form/MVC we could share app pools with multiple applications) as we don’t have the concept of Application domains in CoreCLR and this feature supports to CoreCLR only.

Let’s see an example

Now I have created another sample web application application using ASP.NET Core 2.2 (used VS 2017 v15.9.4) and deployed to IIS after publishing that.

There is no brainer here, let’s see the processes

Just to compare with earlier version I am adding both here.

So we can see the difference, in first scenario (<ASP.NET Core 2.2) the application is running under dotnet.exe while in second scenario, it is running under the worker process (w3wp.exe) itself which boosts the performance significantly as we don’t have to manage the dotnet process (earlier approach could have reliability issues as well) and request doesn’t have to travel outside of the process.

ASP.NET Core 2.2 allows out of process deployment as well. When we publish our application, it generates a web.config which has following xml node

<aspNetCore processPath=”dotnet” arguments=”.\InProcApp.dll” stdoutLogEnabled=”false” stdoutLogFile=”.\logs\stdout” hostingModel=”InProcess” />

Here hosting model at the end defined as InProcess. We can change it to OutOfProcess which would be similar as earlier one and application would be running using dotnet.exe. These configuration can also be set via Visual Studio while debugging as

Go to Solution Explorer -> Right Click on project-> Debug (tab)-> Web Server settings section

Performance comparison

As mentioned above, with ASP.NET Core 2.2 allows us to host both the In-process and Out-of-process model (It is similar to earlier version). I have done sample load test using the Netling (know more about this tool here) and for out-of-process result is here

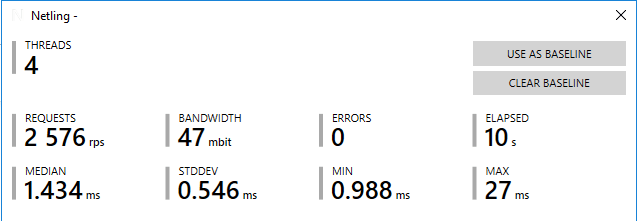
We can see that 2576 request got served per second. I changed the hosting as In-process and ran the same test again and the results are

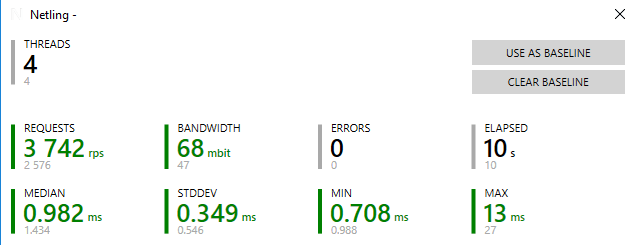
Here we can see that request per second got increased significantly to 3742 which is approximate ~50% increase. Other data points like median, stddev also got reduced significantly. Itmay vary based on the scenario as I ran it on a developer VM and the application used was a default sample application using asp.net core 2.2 (not an empty application). However, Microsoft ran the test in performance labs where they got 4x throughput with In-process hosting.

Conclusion

Even kestrel was introduced with ASP.NET Core as a highly performant web server or as an alternate to IIS, it was always suggested to use IIS as frontend server in windows environment. Initially, many important features were missing in Kestrel which got added with the release of asp.net core 2.0 and 2.1, still IIS is advised to use for enterprise environment and internet facing application mainly due to security and stability reasons. There were several bottlenecks with having two different processes (w3wp.exe and dotnet.exe) and the way like port conflicts/not available, process management etc. All these can be avoided using In-process hosting model.

Cheers
Brij

Hosting ASP.NET Core Applications on IIS – A Detailed Look

In last few years, I spent a significant amount of time researching, writing, speaking on ASP.NET application’s performance. Performance of a web app is not just its code but it depends a lot on the hosting platform, configurations and the usage of available resources etc. If you are hosting ASP.NET Webforms/MVC application on IIS, then you can follow below tips and get benefitted quickly.

12 tips to increase the performance of your ASP.NET application drastically – Part 1
12 tips to increase the performance of your ASP.NET application drastically – Part 2

Whenever I think about the performance of any web application, there are three major areas comes into my mind (I am not considering the external factors)

  1. Hosting Server
  2. Application itself
  3. Database/Third Party APIs etc

Any application can’t be highly performant until all three are properly optimized. It can perform better if all were taken in consideration in early stages development lifecycle.

ASP.NET Web Forms is/was very popular web framework but it has many known performance issues. To overcome many and to use latest standards and best practices, Microsoft introduced ASP.NET MVC framework. Over time, Microsoft sensed the need of new highly performant cross platform web framework to compete in market and introduced the all new ASP.NET Core framework (Initial Name: ASP.NET 5) which is written from scratch. Although at a high level, most of the constructs are similar with ASP.NET MVC but the underlying engine got completely rewritten.

While working on ASP.NET Core, MS worked on the complete stack, like for backend – they introduced Entity Framework core and for hosting the application, a new highly optimized web server, known as Kestrel. But as we know IIS provides an array of features, configuration and battle tested for all kind of scenarios, Kestrel was not ready as an edge server.

Although the new server was introduced with ASP.NET Core but it appears that initially, the main focus was on ASP.NET core and other backend frameworks. During ASP.NET 1.X, it was advised to used IIS as frontend server which in turn forwards the requests to Kestrel. A reverse proxy was suggested due to security and reliability reasons. It didn’t have defense against attacks and other configurations like various timeouts, size limits, concurrent connection limits etc. So, we only had the option to deploy the application using IIS (Nginx, Apache for other platforms) as reverse proxy. In the newer versions (ASP.NET Core 2.X), lot of enhancements has been made in Kestrel and with ASP.NET Core 2.1 and later, Kestrel started supporting https (which is nowadays basic requirement for hosting any web application on internet). Now it can be used as internet facing server . In this post and coming post, we will discuss the available deployment options with IIS and explore that what is happening behind the scene.

Using IIS as a Reverse Proxy:

In this scenario, ASP.NET Core application is hosted on kestrel which sits behind IIS. At a high level, it looks like


I created an asp.net core sample application which I deployed on IIS. Let’s take a quick look into the steps for deployment.

  1. First, we need to configure IIS on Windows (if it’s not there).
  2. Install the .NET Core Hosting Module (Can be downloaded from here based on the versions).  After installation, you can go to the IIS modules section and ANCM will appear as
  3. Create the website at IIS
    1. Create a folder which will contain app’s published folders, files and binaries
    2. Create a new logs folder inside the earlier created which will contain the logs created by ASP.NET Core module when stdout is enabled.
    3. In IIS, Add a new Website by right clicking on Sites folder under Connections -> ServerName as NetCoreProxy (say).
    4. It by default creates a new application pool named as preferably -. Go to application pools under Connections-> Server Name and Click on NetCoreProxy. Select “No Managed Code” under .NET CLR version 
      “No Managed Code” why? We will discuss it later.
    5. Check the identity which is by default as “AppPoolIdentity” and change it if needed.
  4. Last step, publish the website by Right Clicking on the project in Visual Studio in the newly created folder at 3 a.

Publishing the ASP.NET Core App

While publishing an ASP.NET Core app, we need to select the deployment mode option which has two options: Framework dependent and Self-Contained. Publishing with second option produces a significantly larger binaries because it contains the coreclr and other required system libraries. This should not be a preferred option until necessary because of the huge size and performance implications as it loads all the resources and JIT them on the fly.

Now we should be able to browse our ASP.NET core web site.

Let’s take a look in details

The first question that arises is why do we need to install something on IIS? One of the problems with earlier versions of ASP.NET, that ASP.NET and IIS both has its own pipeline which contains multiple modules (IIS pipeline contains native and managed modules) and each request has to go through both the pipelines invoking each module (However this problem was resolve till certain extent using Integrated Pipeline setting at IIS). Most of the times, many of them are not used by the appliccation. Using ASP.NET Core, we got a new pipeline which has list of middleware that are added at application startup based on the need. To avoid all the IIS overheads, when we install the bundle on IIS, it adds a native module AspNetCoreModule (ANCM) which is invoked at very early stage and forwards the requests to Kestrel as soon as it reaches to IIS. Earlier it was done by an existing module called HTTP Platform Handler which used to forward the request but MS decided to create a new native module ANCM which was fork of HTTP Platform Handler to have better control and able to provide tailored features.

Also, we have seen in deployment steps that we selected “No Managed Code” while configuring the application pool, it means we don’t want to run any managed modules for the requests of this application. As mentioned earlier, IIS pipeline contains the native and managed modules both, ASP.NET core requests do go through some of the native modules like authentication modules (Anonymous, basic, Windows etc), dynamic compression etc. Few native modules are not part of the process and as many of them has a corresponding asp.net core middleware (for details, look here). Let’s take a look that how does it work

We can see here that ASP.NET core app runs into a different process dotnet.exe, not in the worker process which was the case with earlier versions of ASP.NET. I also used the process explorer to see it

Here we can see that dotnet.exe is a different process which runs the application. What is this Console Host process? If we take a look in ASP.NET core’s startup class, we will see a main method, similar to console application which is the first method which gets called when the application starts.

Let’s go through step by step process, how a request is served in this scenario

  1. The request is received by the HTTP.sys from the network.
  2. If response is cached at HTTP.sys then it is sent back from there else gets a place the corresponding Application Pool’s queue.
  3. When a thread is available in the thread pool, it picks up the request and start processing it.
  4. The request goes through IIS processing pipeline. As mentioned earlier the request goes through few native IIS modules and once it reaches to ANCM, it forwards the request to Kestrel (under dotnet.exe).
  5. ANCM has a responsibility to manage the process as well. If (re)starts the process (if not running or crashed) and IIS integration middleware configure the server to listen the request on port defined in environment variable. It only accepts the requests which originates from ANCM.
    Note -Please do note that in ASP.NET Webforms/MVC the application is hosted under the worker process w3wp.exe which is managed by Windows Activation Service (WAS) which was part of IIS.
  6. Once the request is received by Kestrel, it creates the HTTPContext object and request is handed over to ASP.NET Core middleware pipeline.
  7. The request is passed to routing middleware which invokes the right controller and action method (model binding, various filters almost similar way as earlier versions).
  8. Finally, the response is returned from the action and passed to kestrel via Middlewares and later sent back to client via IIS.

So we can see the request processing is quite different than earlier versions ASP.NET apps hosted on IIS.

Using Kestrel as an Edge Server

With ASP.NET Core 2.1, Kestrel got lots of new capability which makes it capable of using it an edge server, however for the enterprise level application, it is still recommended to use it behind a proxy. Obviously, one of the first choices is using IIS in windows environment. With ASP.NET Core 2.2, It got some more refinement which makes IIS a better option. We will discuss that in next blog post. Kestrel as an edge server looks like

As this post is specific to IIS hosting, I will not go into the detail but earlier lots of important web server features like Keep alive timeouts, connection timeout, body reading timeouts, request timeouts, size limits, concurrent connection limits, memory limits etc were not available but now most of the configuration can be done and it supports https as well. Even with that Microsoft suggests using IIS as a reverse proxy due to additional feature, security, configurations and many more.

Hope you have enjoyed the post. Do share the feedback. In next post, We will discuss the In-process enhancement  in ASP.NET Core 2.2 in detail.

Cheers
Brij

Exploring ASP.NET Core View Component

Partial Views and Child Actions are one the most used features of ASP.NET MVC. Partial Views provides us a way to create a reusable component that can be used in multiple Views. There are Actions which can be marked as Child Actions and these cannot be invoked via URL but inside views or partial views. Child Actions are no more available with ASP.NET Core. View Components are new way to implement this feature in ASP.NET Core.

Few Challenges with Partial Views

Partial Views has certain challenges and limitations. Say if we use child action in a view then while execution, an additional life cycle takes place, first ASP.Net MVC life-cycle executes for the loading the main View and once it gets loaded, another for the Child Action. Also, putting certain filter like Authorize over Child Action, used in layout, makes the complete page fail if authorization fails. It also does not support the awesomeness of async programming, test-ability, Separation of Concerns etc.

What is View Component?

View Component is one of the many awesome features introduced in ASP.NET Core. As mentioned earlier, View Components are similar to Partial View and enables us to write reusable component which can be used in multiple views. View Components are robust, leverages asynchrony, Dependency Injection friendly, follows separation of concerns which makes it easily maintainable and testable.

How to Create a View Component

There are few ways to create a View Component. These are

Class name ends with ViewComponent

We can write a plain C# class and name it with suffix ViewComponent as

public class TopBooksViewComponent
{
    public void InvokeAsync()
    {
        // View Component Logic
    }
}

ASP.NET Core recognizes the suffix and render it as view component. As this is a plain C# class, we would not have the basic MVC feature available like MVC Context etc.

Using ViewComponent attribute

It provides another way to create a View Component. We just need to put this attribute on any class as

[ViewComponent]
public class TopBooks
{
    public void InvokeAsync()
    {
        // View Component Logic
    }
}

This is almost similar as previous one. Here again we won’t have the liberty of MVC features until it is inheriting another entity. There is one more usage of this attribute, to provide a custom name to the View Component as

[ViewComponent(Name = "Featured Books")]
public class TopBooksViewComponent
    {
    public void InvokeAsync()
    {
        // View Component Logic
    }
}

Derive from ViewComponent Class

It is a simplest way to create powerful View Component via leveraging standard MVC features like HttpContext, TempData, ModelState etc. Also it allows us to use View similar to normal mvc controller. Here we don’t need any suffix in the class name (which was required in earlier ASP.NET Core versions). It looks as

public class TopBooks : ViewComponent
{
    public async Task<IViewComponentResult> InvokeAsync()
    {
        // View Component Logic

        return View();
    }
}

We will use the third option in our example. So let’s start

Note – For this example, I am using Visual Studio 2015 update 3 and ASP.NET Core 1.1.1. Complete code can be downloaded from here.

Here we will be creating a View Component which shows Top n (based on the parameter) books. For this, we will be reading the data from a book repository where we have hard coded data but in real applications, it could be read from Database, web service etc. Let’s have a look on this

public class Book
{
    public int Id { get; set; }

    public string Title { get; set; }

    public string Image { get; set; }

    public string Author { get; set; }

    public float Rating { get; set; }

}
// Repository
public interface IBookRepository
{
    Task<IList<Book>> GetTopBooksAsync(int noofBooks);
}

public class BookRepository : IBookRepository
{
    static IList<Book> allBooks;

    public BookRepository()
    {
        allBooks = new List<Book>()
        {
            new Book() { Id=1001, Title="Lifehacker: The Guide to Working Smarter, Faster, and Better", Image="LTGWSFB.jpg", Author="Adam Pash; Gina Trapani", Rating=4.4F },
            new Book() { Id=1002, Title="Mindhacker: 60 Tips, Tricks, and Games to Take Your Mind to the Next Level", Image="M6TTGTYMNL.jpg", Author="Ron Hale-Evans; Marty Hale-Evans", Rating=4.6F },
            new Book() { Id=1003, Title="Information Technology for Management: Improving Strategic and Operational Performance", Image="ITMISOP.jpg", Author="Efraim Turban; Linda Volonino", Rating=5F },
            new Book() { Id=1004, Title="Visualize This: The FlowingData Guide to Design, Visualization, and Statistics", Image="VTTFDGDVS.jpg", Author="Nathan Yau", Rating=4.6F },
            new Book() { Id=1005, Title="Creating Personal Presence", Image="CPP.jpg", Author="Dianna Booher", Rating=4.4F }
        };
    }
    public Task<IList<Book>> GetTopBooksAsync(int noofBooks)
    {
        return Task.Run(() =>
            {
                IList<Book> orderedBooks = allBooks.OrderByDescending(b => b.Rating).ToList().Take(noofBooks).ToList();
                return orderedBooks;
            });
    }
}


We have created a book class with basic properties. Then we created an interface for repository and implemented the same in BookRepository which implements the GetTopBooks method. As mentioned earlier the data is hard-coded here. So we have created our Repository, we need to add it in our application. ASP.Net Core is DI (Dependency Injection) friendly and provides a basic DI container. To add this repository, we need to write the below code in ConfiguerServices method at startup.cs

services.AddTransient<IBookRepository, BookRepository>();

It injects a new instance of service every time it is used in the application. There are few other options based on the scope and life time of instance. To learn more about dependency injection ASP.NET MVC core refer my previous post.

Till now we have written code for supplying data to our component. Now it’s time to write the View Component.

Step 1:

First, we will create a Class which derives from ViewComponent. I have created a class name TopBooks and here we need to implement InvokeAsync method which can take multiple parameters based on the need which is passed while invoking the view component. My View Component class looks like

public class TopBooks : ViewComponent
{
    IBookRepository bookRepostiroty;
    public TopBooks(IBookRepository repository)
    {
        this.bookRepostiroty = repository;
    }
    public async Task<IViewComponentResult> InvokeAsync(int noOfBooks)
    {
        var items = await bookRepostiroty.GetTopBooksAsync(noOfBooks);

        items.ToList().ForEach(b => b.Image = @"/images/" + b.Image);

        return View(items);
    }
}

In the InvokeAsync method, we are passing a parameter noOfBooks and based on that we are fetching the books from bookRepository. The items return by the repository contains the book image name which is getting converted in the complete URL so that it can be directly used on UI. Then we are passing these items in the view. We didn’t provide a view name, it finds a view with name Default.cshtml but we can also provide any other name as well. For that we need to pass the view name in string format, similar to normal controller returning named view. We can see that here the return type of this method is IViewComponentResult which is specific for View Component.

This class looks like mini controller as it returns the view. It has only one method InvokeAsync which can be called from the specific View Component, not from the browser. It also provides another method InvokeAsync which can be used instead for async handling.

We used here our BookRepository that we created and it got injected via constructor. Now we will move to step 2.

Step 2:

We need to create the UI for View Component. It is normal razor view and we will create a new view with name as Default.cshtml. We cannot put this view anywhere but one of the following locations

  • ~/Views/Shared/Components/[ViewComponentName]/Default.cshtml
  • ~/Views/[ControllerName]/Components/[ViewComponentName]/Default.cshtml

If we want to use the View Component across multiple controllers, then first location should be used. On the other hand, if we want to restrict its usage to the same controller then second option should be chosen.

Also as we choose the name of the view component as default.cshtml but we can use any other name. When we have any other name like Foo.cshtml then we need to pass the name of View from our mini controller as

 return View("Foo", items);

It is similar like Views in the normal controller where if the action name and view name is same then we do not need to pass the view name else need to provide.
Let’s see our View (Default.cshtml)

@model IEnumerable<ViewComponentBlog.Models.Book>
<table class="table table-condensed table-hover">   
<tr> 
<th> </th>
<th> Title</th>
<th> Author</th>
<th> Rating</th>
    </tr>
    @foreach (var b in Model)
    { 
<tr>  
<td> <img src=@b.Image /></td>
<td> @b.Title</td>
<td> @b.Author </td>
<td> @b.Rating</td>
        </tr>
    }
</table>

It is like normal view where we have the list of books as in the model and we iterated that to display on the screen.

Step 3:

Now the final step is to use the View Component in any view. It is very simple, we can invoke it at any place.

@await Component.InvokeAsync("TopBooks", 3)

Here the first parameter is the name of the view component and then the parameters that we used while implementation of InvokeAsync method. We used only one parameter number of books so here we are passing the same. Other important thing as we are using asynchronous method, we need to use await keyword as in the example else it won’t be rendered on the screen.

Now we are done and now let’s run the application

So we can see that our view component is displayed as expected.

View Component can also be used in MVC Controller as well. For that we need to use ViewComponetResult class as

public IActionResult IndexVC()
{
    return ViewComponent("TopBooks", 3);
}

How to use ViewComponent as TagHelper 

View Component also can be used tag helpers in ASP.NET Core 1.1. Tag Helpers are also a new feature introduced with ASP.NET Core which provides us to render a server side code in the razor mark up in a HTML friendly way and allows us to write robust, reliable and maintainable. I wrote a post on it long back on it, you can have a look here. As newer version of ASP.NET Core got released, there may be slight changes in it. To use it as TagHelper we need to first include TagHelper library in project.json (Microsoft.AspNetCore.Mvc.TagHelpers) then add it in the Views as

@addTagHelper *, Microsoft.AspNetCore.Mvc.TagHelpers
@addTagHelper *, ViewComponentBlog

Here ViewComponentBlog is the project name. Now it can be used on the view as

<vc:top-books no-of-books="2" >
</vc:top-books>

It looks simpler and cleaner. To use any View Component, the tag should start with vc and the view component and parameter name are converted on lower kebab case (means all in lower case and if there is case change then a hyphen is inserted like TopBooks changed to top-books), it would not work if the naming is not properly used. So now you have the beauty of TagHelper with ViewCompoenent.

Conclusion

In this post, we have seen that View Component is powerful feature of ASP.NET Core which can be used to write complex reusable controls for the application. It is loaded with separation of concern, async and testability features and similar to normal controller and view.  We created a sample view component in step by step approach and used that in a view and used the power of DI for injecting Repository in our control.  Also, we saw that in ASP.NET Core 1.1, it can be written as TagHelper which makes sure, we are not forced tow write C# code in the view J. Complete code is attached with the post.

Leveraging Dependency Injection in ASP.NET Core

Millions of software has been built in last couple of decades which helped in coming up a set of patterns for resolving different problems and we have a ready reference as GoF design patterns from quite long now. In last decade, Inversion of Control and one of its implementation Dependency Injection (DI) became one of most used pattern across platforms for building great soft wares. Agile methodology for building software which focuses on small releases and more adaptive to the changes, made it very important tool. In this post, we will discuss Dependency Injection and different.

What is Dependency Injection?

Dependency Injection is a design pattern which is an implementation of Inversion of Control (IoC) that provides us a way to resolve dependencies. Objects works in collaboration model and the whole communication becomes pretty complex as system grows.  Inversion of Control says that the objects should not itself create the object/component on which they are dependent to their work, instead these are passed from external sources.

ASP.NET Core and DI

Due to DI’s long list of advantages it has become the norm in software development. But implementation in earlier versions of ASP.NET was not straight forward. Although there are different extensions and libraries made our life easy but ASP.Net as a framework was not open for the same. Due to these kind of new challenges, Microsoft has overhauled the complete framework and made the changes from ground up. The new framework is modularized and using the DI at its core. ASP.Net Core itself provides basic IoC container that we will discuss and later we will how we can use other.

Default container in ASP.NET Core

As mentioned earlier that ASP.NET Core uses DI for instantiating all its components and services. This container is configured in startup.cs class which is the entry point to an ASP.NET Core application. In Startup.cs we have method ConfigureServices which is where we configure all the services that can be later used in the entire application’s life cycle. Let’s see what all are the options provided by ASP.NET core.

aspnetdicore

ASP.NET Core provides above three options to register the services. Let’s discuss each.

AddTransient

Services registered using this method get instantiated each time it is accessed. If we have a service which is used multiple places in same request, a new instance would be created each time.

This method should be used for lightweight, stateless and rarely used services. Let see an example.

Here I have created a service named as TestService which has a method named as GetUniqueId. In this method, I am returning the hash code of the for the instance to check the uniqueness of the instance as

    public class TestService : ITestService
    {
        public int GetUniqueId()
        {
            return this.GetHashCode();
        }    
    }

This service is injected at two places in the sample MVC application

  1. In my home controller as
        public class HomeController : Controller
        {
            private ITestService testService;
    
            public HomeController(ITestService _testService)
            {
                this.testService = _testService;
            }
            public IActionResult Index()
            {
                ViewBag.ServiceInstanceId = testService.GetUniqueId();
                return View();
            }
        }
    
  2. And in my view (Yes we can inject services in the View as well) as
    cshtmlinject

Here service is injected in it at line 1 and called the GetUniqueId method at line 6. While at Line 4, unique Id for the instance is displayed that got injected in home controller. Now it’s time to test the application and register the service as

public void ConfigureServices(IServiceCollection services)
        {
            services.AddMvc();
            services.AddTransient<ITestService, TestService>();
        }

When we run the application
addtransient
Here we can see that in the same request we are getting two instances as expected.

AddScoped

In case of AddScoped, only one instance is created for each request, regardless the number of times it is used in the request. So if you have a service which maintains some state in each request or used frequently then it could be a better choice.

In the same example, we will change the registration of service as

services.AddScoped<ITestService, TestService>();

And run the application
addscoped1
Here we see that only one instance created for the same request. Let’s see multiple requests
addscoped2
As expected here, two different instances gets created for different request while it is unique per request.

AddSingleton

As the name suggests, it created only once instance which get created in the first request itself. In every subsequent request, same instance is used. So, if there is requirement of a singleton behavior, maintaining state across requests then this option is best. Creating our own singleton behavior is not recommended.

It provides two important flavors.

  1. First where we let the framework to create the instance as
    services.AddSingleton<ITestService, TestService>();
    
  2. Second where we create the instance and register the same instance as
    ITestService testService = new TestService();
    services.AddSingleton(testService);
    

    So if we have some custom heavy object that can be used across request or do some changes in the instance before registering then second option is good.

Now let’s run the application
addsingelton
Here we get the same instance across multiple requests.

Third party DI containers

For basic usages of DI, we can use the default DI container but for the advance usage, we can use any third part DI container with the ASP.NET like Autofac, Unity, Ninject etc or some custom one. For that we need to have an adapter which provides implementation of IServiceProvider or we can write our own. We have already the required implementation for Autofac which can be easily integrated. let’s see that.

Using Autofac with ASP.NET

It’s very simple to leverage to use the power of Autofac. We need to include the following package in our project.

Autofac.Extensions.DependencyInjection

Once that is added, we need to make few changes in ConfigureServices Method. By default, it returns void but to use other provider, it should return IServiceProvider. We will create the instance of ContainerBuilder then register our services. Then get the container and return the service provider from the context.

        public IServiceProvider ConfigureServices(IServiceCollection services)
        {
            services.AddMvc();

            var builder = new ContainerBuilder();
            builder.RegisterType<TestService>().As<ITestService>().InstancePerLifetimeScope();
            builder.Populate(services);
            var container = builder.Build();
            return container.Resolve<IServiceProvider>();
        }

Here we can see that we provided the life time of the instance while registering the service similar to AddScoped. We can also see that we used default container to add mvc, it means we can mix and match with containers.

Final words

Dependency Injection is very helpful for writing loosely coupled and testable software. Its usage with earlier versions of ASP.NET was bit tricky but with the new version ASP.NET, It has become the first-class citizen of ASP.NET Stack. We have seen that it provides a basic DI container and discussed with an example with details. Also, we discussed that how we can configure other third party containers like Ninject, Autofac, unity etc. We have configured Autofac in our example and saw we can use multiple container in same application.

Learning ASP.NET Web API [Packt] – ASP.NET Core RC1 to ASP.NET Core 1.0

Hello All,

Recently, I published a video course on ASP.NET Web API using ASP.NET Core framework. Initially, when I started working on it, it was named as ASP.NET 5 and as it progressed till last section, Microsoft announced to rename it as ASP.NET Core and RC2 got released few days prior to the course release date. Microsoft took more than six months to release the next RC version. Although the concept was same but there were major changes in tooling and libraries. As it was not the final version so we decided to provide the details of differences once RTM releases.

In this post, I will be putting the details of the changes by section and also update the sample which will be available with the course. As ASP.NET 5 got renamed to ASP.NET Core, accordingly the names of libraries got changed to ASP.NET Core as well so we need to change all the references. The following table contains the details of packages that we need to update in our sample with the video number.

ASP.NET 5 Reference (Earlier) ASP.NET Core 1.0 Reference (Current) Video#
Microsoft.AspNet.Mvc Microsoft.ASPNETCore.MVC 2.2
EntityFramework.Core
EntityFramework.MicrosoftSqlServer
Microsoft.EntityFrameworkCore
Microsoft.EntityFrameworkCore.SqlServer
2.3
Microsoft.AspNet.Mvc.Formatters.Xml Microsoft.AspNetCore.Mvc.Formatters.Xml 2.4
Microsoft.AspNet.Mvc.TagHelpers
Microsoft.AspNet.Identity.EntityFramework
Microsoft.AspNetCore.Mvc.TagHelpers
Microsoft.AspNetCore.Identity.EntityFrameworkCore
5.4

Updated sample is available with the course and refer the project.json to find the updated references. Also, Microsoft again reintroduced web.config file but it will be there along with Project.json.

Note – The details will be included for only for those those sections where changes are required.

Section 2   
As this was the first section where we started our discussion on ASP.NET Core Web API and started working on our sample so this section got many changes. Let’s discuss each

Video 2.1 : There are changes in the project creation flow. Earlier when we used to create ASP.NET Core project, it used to have two sets of references – one for core and other for full framework. We either used to build the application using both the framework and remove one based on our needs. As there were many libraries which could not work in both the platforms so Microsoft has provided the option to select the framework upfront while creating the project which makes the complete process simpler. Also, in real world scenarios, there are rare chances when we need to build the binaries for both the framework.  Now when we open New Project window and select web from left side then we get three options as
2.1Here we have three options.

  1. First one is a traditional ASP.NET application using .NET 4.6.
  2. Selected one is ASP.NET Core application using .NET Core framework and the same is used in our course.
  3. Third one is again ASP.NET Core application but uses the standard .NET framework.

When we select the second option, it shows the following dialog

2.1_2

It also got revamped completely. We had earlier lots of options which included standard ASP.NET templates. Now it contains only ASP.NET Core templates and has three options same as earlier ASP.NET 5 templates and we used the empty template for our course. Just to mention again, now we have just one bag named as .NETCoreApp,Version=v1.0  which contains set of libraries for .NET Core only in the references.

There are some more changes as below

a) Earlier we used to have following line in startup.cs which was entry point for the web application

// Entry point for the application.
public static void Main(string[] args) => WebApplication.Run<Startup>(args);

but now we have a new file program.cs which contains the main method which is now entry point for the web application.

b) Configuration file web.config is also back in project file and available along with project.json although all the settings should be put in project.json and we will be using the same.

c) There are also changes in the number of the parameters in ConfigureServices method in startup.cs which includes Hosting Environment and logger factory but we will not be using it in our sample.

Video 2.2: Only change in the references. Refer the initial table.

Video 2.3: In this video, we discussed that there are four options to register a service but we found AddSingleton and AddInstance very similar, both allows single instance across multiple requests with a difference in the instance creation. Now we have only AddSingleton where either we can pass the instance or provide the type info as.

To register via interface and class name

services.AddSingleton<IBookStoreRepository, BookStoreRepository>();

and to register an instance

IBookStoreRepository bookStoreRepository = new BookStoreRepository(new BookStoreContext());
services.AddSingleton(bookStoreRepository);

Video 2.4: Only change in the references. Refer the table.

Section 3
In this section we added CRUD operations to our sample using  HTTP verbs. Only few changes are required in the section as mentioned below.

Video 3.2: Microsoft did an awesome change with it by making the JSON response in camel case by default. In our sample we added serialize settings in statrtup.cs as

options.SerializerSettings.ContractResolver = new CamelCasePropertyNamesContractResolver();

It is no more required.

Video 3.3 :  We returned various status codes from the action methods based on the request.The classes that we used also got renamed as

ASP.NET 5 ASP.NET Core 1.0
HttpUnauthorized Unauthorized
HttpNotFound (and its overloads) NotFound
HttpBadRequest (and its overloads) BadRequest

The above changes has taken place in all the action methods wherever used.

Section 4 
In this section, we added few more features to our sample like sorting, paging etc. Here there is a change in the way we access URL Helper as discussed below.

Video 4.3: We used URL helper for generating the URLs and it was injected via constructor without any other changes as it was by default available which is not the case now.

Now we need to access it via UrlHelperFactory and action context. ActionContext is accessed via ActionContextAccessor, for that we need to register it in startup.cs as

services.AddSingleton<IActionContextAccessor, ActionContextAccessor>();

and we need to inject the UrlHelperFactory and ActionContextAccessor in constructor to get the URL helper as

  public BooksController(IBookStoreRepository _repository, IUrlHelperFactory urlHelperFactory, IActionContextAccessor actionContextAccessor)
        {
            this.repository = _repository;
            this.urlHelper = urlHelperFactory.GetUrlHelper(actionContextAccessor.ActionContext);
        }

Rest of the code would be same as we got the similar URL helper.

Section 5
In this section we talked about security implementation. In it we have only few changes as below.

Video 5.2 : We created a custom authorization attribute RequireHttpsAttribute which inherited from AuthorizationFilterAttribute where we checked the scheme from the URL. Now RequireHttpsAttribute is itself available under the namespace Microsoft.AspNetCore.Mvc so we can use the same to enforce the SSL in complete application or any specific controller/action.

Video 5.4 : Only few references changes. Refer the table

Section 6 
In this section, we discussed some advanced topics like DI, CORS etc and there are few changes in DI. Let’s see that

Video 6.1:
a) As discussed earlier that now we don’t have AddInstance option for registering the service, same can be achieved via AddSingleton.

b) We discussed that we can also inject services via property using FromServices attribute but it is not available any more as it was creating confusion and issues. Constructor injection is always preferable. From services is available and can be used for Action Injection as

public IEnumerable<Book> Get([FromServices] IBookStoreRepository repository)
{
...
}

These are the key changes that took place specific to Web API and our course. I created again the sample from scratch using the ASP.NET Core 1.0 which can be downloaded from the course.

Thanks a lot for your support and feedback.

Cheers
Brij