Leveraging the Power of Asynchrony in ASP.NET

Asynchronous programming has had a lot of attention in the last couple of years and there are two key reasons for this: First it helps in providing a better user experience by not blocking the UI thread which avoids the hanging of the UI screen until the processing is done and second, it helps in scaling up the system drastically without adding any extra hardware.

But writing asynchronous code and managing the thread gracefully was a tedious task. But as the benefits are tremendous.. Read complete post on Infragistics blog

User Name availability check with AngularJS, ASP.NET MVC and ASP.NET Web API


User Name availability check is required in most of the registration forms where we allow user to choose a user name that one can use to login later. In some other scenarios, we allow user to use his/her email as login id/user name. In both the scenarios, we require to make sure that user name or email is not used earlier. In this post, I am going to discuss, how to achieve this feature in an application which is developed using AngularJS, ASP.NET MVC and ASP.NET Web API. I wont discuss in detail the Data Access part, where one can use any approach like Entity Framework, Identity Framework , Membership provider or ADO.NET.

In this post, we will create an empty ASP.NET project with MVC and Web API. We’ll start working on Web API  part where an API will be exposed which will take user’s entry for user name as input and return true and false based on its existence. After that we will work on MVC part where we will create a registration form where user will put its information. In last, we will focus on AngularJS and create the basic infrastructure including a Service which will call the Web API to check the user name existence then how will do the check on view we will discuss at later section.

I created an API folder under Controller and created an empty Web API controller (RegistrationController) which exposed an API IsUserNameAvailable which takes an username and returns true if available else returns false. It is as

  [RoutePrefix("api/Register")]
    public class RegistrationController : ApiController
    {
        [Route("IsUserNameAvailable")]
        [HttpGet]
        public bool IsUserNameAvailable(string userName)
        {
            IRepository rep = new SQLRepository();
            IList<UserAccount> users = rep.GetUser(userName);
            return users.Count == 0;
        }
    }


Inside the API, I have used a SQLRepository which connects to the database and returns a list of users based on it. If there is no match then list contains no items. Let’s have a look that our table in database form where the account is getting matched.

table

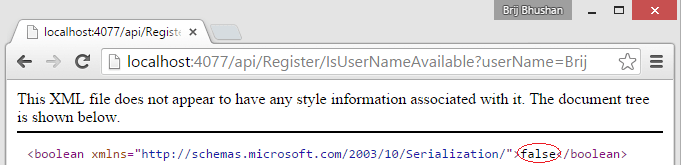
Now let’s just quickly check that whether our API is working properly. The simplest way to check any API Get request via browsing the URL itself. So let’s check the URL

http://localhost:4077/api/Register/IsUserNameAvailable?userName=Brij

So as we see that Brij exists in the database so it returns false.

WebAPIResult

Now let’s create an empty MVC controller (UserRegistrationController) and View for the Index action which has an input control to enter the username.

Now its time to introduce the AngularJS into the application. Let’s see that what all the AngularJS components we need to create to implement the feature.

  1. Angular Module – To bootstrap the application.
  2. Service – This service will connect to exposed Web API to check the user name availability. It will initiate the AJAX (http) call and get the appropriate response accordingly.
  3. Angular Controller- To add some logic
  4. Custom Directive – We will discuss it in later section

I have created a new folder Registration in scripts folder to put all the angular resources. I created an angular module (file name as RegModule) which has currently

var registrationModule = angular.module('registrationModule', []);

Now it time create a service which will connect to the server to check the user availability and return true or false accordingly. I am using Factory method for creating service as

registrationModule.factory("RegService", function ($http, $q) {
    return {
        IsUserNameAvailablle: function (userName) {
            // Get the deferred object
            var deferred = $q.defer();
            // Initiates the AJAX call
            $http({ method: 'GET', url: 'api/Register/IsUserNameAvailable?userName=' + userName }).success(deferred.resolve).error(deferred.reject);
            // Returns the promise - Contains result once request completes
            return deferred.promise;
        }
    }
});

Now to handle the UI part, we have two options

1- Either we do all the UI manipulation using Angular controller and add the required code. Or

2- We can create an custom directive where all the logic will be put to check the uniqueness of the username and updating the UI.

Lets quickly see first option, where we will write the logic in Angular Controller  as

    $scope.checkUserAvailable = function () {
        RegService.IsUserNameAvailablle($scope.Registation.username).then(function (userstatus) {
            $scope.registrationForm.username.$setValidity('unique', userstatus);
        }, function () {
            alert('error while checking user from server');
        });
    };

Here we are using $setValidity of for the model and add the unique attribute and set it true/false based on the service response. This will set the validity of the input as true/false and we can show some messages based on that. So let’s see the form


<div class="container" ng-app="registrationModule">

<div class="row" ng-controller="regController">

<form name="registrationForm" role="form">
            <label for="username">User Name:</label>

<div class="form-group">
                <input type="text" name="username" id="username" ng-model="Registation.username" class="form-control" placeholder="Username" ng-blur="checkUserAvailable()" />
                <span class="alert alert-danger" ng-show="registrationForm.username.$dirty && registrationForm.username.$error.unique">
                    User name is not available
                </span>
            </div>

        </form>

    </div>

</div>

We are calling checkUserAvailable function in blur event so that it gets fired when user moves focus from the control after entering the data. We also added a span (p) to show the error message which checks the input control state and unique attribute that we added. Now let’s run the application and see

sample

As Brij is already exists in the database so it is not available and if you enter any other username which is not available in database, it wont show the message.

Second option is much cleaner so we will create a custom directive (I have written 19 posts on AngularJS, you can go here to learn all the topics or for custom directives refer the Part -9 and Part -10)

So let’s create our custom directive. Here it will use the RegService and add an onblur event to the input which will be fired once user goes out of the control after entering the some data as

registrationModule.directive('useravail', ['RegService', function (RegService) {
    var directive = {
        restrict: 'A',
        require: 'ngModel',
        link: function (scope, element, attrs, ngModel) {
            element.on('blur', function (evt) {
         
                if (!ngModel || !element.val()) return;
                var curValue = element.val();

                RegService.IsUserNameAvailablle(curValue)
                .then(function (response) {
                        ngModel.$setValidity('unique', response);
                }, function () {
                    //If there is an error while executing AJAX
                    ngModel.$setValidity('unique', true);
                });
            });
        }
    }
    return directive;
}]);

Here we have used similar code that we wrote in angular controller. Here we added blur event to the input control in directive. So let’s see the form


<div class="container" ng-app="registrationModule">

<div class="row">

<form name="registrationForm" role="form">
            <label for="username">User Name:</label>

<div class="form-group">
                <input type="text" name="username" id="username" ng-model="Registation.username" class="form-control" placeholder="Username" useravail />
               // later code is same as first option so removed forbrevity

We have set the ng-model and added our custom directive useravail as an attribute at the end in the input element. When we will run this application, it will have same as first option.
So we have implemented User name check using AngularJS, ASP.NET MVC and Web API. We can change the look n feel based on our need. Complete code is attached with this post.

Cheers
Brij

Getting started with Unit Testing in {{AngularJS}} – Part 19

Unit Testing one of the important activities in software development. It helps in reducing the number of bugs in the code and maintaining the code quality. As now a days we work on small releases and keep adding/updating features, Unit Test plays a vital role in maintaining the quality and helps in making sure that new changes does not break earlier functionality and reduces the testing effort. Unit Test becomes more important for languages like JavaScript because it is loosely typed and we don’t find issues until we run the functionality. Also testing and debugging JavaScript is another time consuming activity.

Note – This post is a part of series of posts on AngularJS and it is 19th one. Click here to view all the post. Apart from that you can also use the navigation links for next and previous post in each post at the bottom to check all.

What is Unit Testing

Unit Test is a snippet of code or function which tests a unit of code (function/API) and all the required dependencies are mocked. It means it just test the business logic written in the function and if any other dependent instance is required then mocked version is used. Unit test does not call any real service, database call etc.

What do we need in AngularJS to get started

Being a .NET developer, I have written thousands of unit tests using C# and Visual Studio. You might be knowing that to create and run an unit test, we require unit test framework where we can run our unit test (like NUnit, MSTest etc), Unit test APIs , Mocking framework  (like NMock, Rhino mock) and then these tests can be part of Continuous Integration system where we can run the unit tests on every check-in to the repository. Similar infrastructure set up we also need in AngularJS. There are many options but I am going to use the most recommended one’s. Let’s discuss all

  1. Jasmine – It is a behavior driven development framework for testing JavaScript code and preferred for Angular Applications. There are similar others like Qunit that we can use.
  2. Angular- mock – Angular provides its own mocking framework which helps in mocking the dependent objects.
  3. Test Runner –  One of the most used Test-runner in Karma but as we are fond of using Visual Studio, there is another nice test runner called Chutzpah which provides a plugin (Chutzpah Test Adapter) for Visual Studio which is very useful.

We have discussed the required tools. Now let’s set up our environment as

  1. Create a ASP.NET Project (I am starting with empty ASP.NET MVC Project with Unit Tests).
  2. Install Chutzpah Test Adapter plugin via Nuget manager
    chutzpah
  3. Install Jasmine Nuget package.
    Jasmine
  4. Add Angular mock (angular-mocks.js) library for mocking purposes.

Now we have set up our solution. First we will write a simple (addition) method and a unit test to verify the set up. Before writing test let’s understand the following three items which are minimum to write any unit test using Jasmine.

  1. describe – This is a global function that takes string and function as parameter which represents a suite of test. In another way, it provides us a way to group multiple tests.
  2. it – This is another function which is written inside global function and takes two parameter as above string and function and this function is actual test.
  3. expect – It takes the function that need to be tested as parameter and provide a list of matchers to match the result.

Let’s write a JavaScript  function and write unit test for that as

  1. Add a folder in scripts folder (say CustomAngular) and add new JavaScript file say Home.js .
  2. Write a Add function in the Home.js as
    function Add(firstnum, secondnum) {
        return firstnum + secondnum;
    }
    
  3. Add a file Home.test.js in scripts folder of Unit Test project to write our unit tests cases.
  4. It’s time to write our unit test for the same as
    describe("My First Test -&amp;gt; ", function () {
        it("Add with two positive num", function() {
            expect(Add(2, 3)).toEqual(5);
        });
    });
    

So we have written our first test. I already explained the special key words used here. You also need to include the references of Jasmine library and Home.js here. To run this Unit test, we just need to build the solution and open the Test Explorer and run the Unit Test. After running the Unit Test it will show green as

TestExPSampleIt means we have set up our infrastructure correctly. So let’s move to real stuff. First we will create a MVC sample application then write unit test. This application would be similar to which we have created in our series of post. But we will take small steps to understand it better. Our MVC application looks as

ExampleLet’s see code quickly. Our MVC controller (HomeController) has just one Index method which returns a view. Our Index View is as


<h2>Talk Details</h2>


<div class="container">

<div class="row" ng-controller="talkController">

<table class="table table-bordered table-condensed table-hover">

<tr ng-repeat="talk in talks">

<td> {{talk.id}}</td>


<td> {{talk.name}}</td>


<td> {{talk.speaker}}</td>


<td> {{talk.venue}}</td>


<td> {{talk.duration}}</td>

 </tr>

 </table>

 </div>

 </div>

Now let’s see our JavaScript file where we have put up our Angular code

var homeModule = angular.module("homeModule", []);

homeModule.controller("talkController", ['$scope', function ($scope) {

    $scope.talks =  [
        { id: '1001', name: 'Real Time Web Applications with SignalR', speaker: 'Brij Bhushan Mishra', venue: 'Hall 1', duration: '45' },
        { id: '1002', name: 'Power of Node.js', speaker: 'Dhananjay Kumar', venue: 'Hall 2', duration: '75' },
        { id: '1003', name: 'Getting started with AngularJS', speaker: 'Brij Bhushan Mishra', venue: 'Hall 1', duration: '60' },
        { id: '1004', name: 'Microsoft Azure - Your cloud destination', speaker: 'Gaurav mantri', venue: 'Hall 1', duration: '45' }
      ];

}]);

Also I have included Angular library, Home.js and added ng-app attribute as well. Now we will write the unit test for our Angular Controller.

First let’s understand our Angular controller. Here We have a module and a controller which takes one parameter $scope. So while writing test, we require these three items and these need to be initialized first before running the test. To initialize, Jasmine provides us beforeEach function which can be used to initialize the items which runs before the test. And we need Angular mock library to set up all. Let’s see the test and then discuss each

describe("Talk Controller Tests -> ", function () {
    var scope;
    var $ctrlCreator;

    beforeEach(module("homeModule"));
    beforeEach(inject(function ($controller, $rootScope) {
        $ctrlCreator = $controller;
        scope = $rootScope.$new();
    }));


    it("It should have four talks", function () {
        $ctrlCreator("talkController", { $scope: scope });

        expect(scope.talks.length).toBe(4);
    });

});

In the above code snippet, we first created two variables then initialized homeModule after that we injected controller and scope instance with the help of mock. In our Test, we are testing that length of talks returned by our controller is four. Now we can run our unit test via Test Explorer and it will pass. Similarly we can write many more tested for controller’s functions.

Conclusion

In this post, we talked about Unit test in angular. What are the basic things required to set up the project and get it started. Then we created a simple function Add and wrote unit test for that to check the setup. We continued writing the unit test of our controller and saw that how to initialized items before running the test. Hope you have enjoyed the post. In next Post we will continue talking about Unit Testing and write unit tests for some other components.

Cheers,
Brij

Top 12 tricks to insert common code snippets : Productivity Tips

This post is in line with my previous post where I talked about how one can be more productive with Visual Studio. In last post, We discussed top 12 shortcuts that helps a lot while writing and reviewing code in day to day work. While writing code we need to follow to follow certain rules and constructs that also becomes very repetitive say, you are writing classes for your domain or adding properties or defining constructors or putting try block and lot more where we just need to write the code in similar pattern and are no brainer. Spending time in these types of code are kind of waste of time and energy. To see my previous post, use the link below

Top 12 Visual Studio short cuts – Productivity Tips

In this post, I am going discuss 12 tricks that can insert code snippets just by few keystrokes.

1- Writing a class is a one of the most common repetitive code we write. Use

  class press TAB

1-Class


Once the snippet inserted, it puts the cursor at MyClass which allows to change the name of class instantly without any extra keystroke.

2- Writing constructor is also another task which is very common and many times we many constructor for the same class. To write constructor use

ctor press TAB

ctor


3- Now Class is created. Let’s add property now. Use

prop press TAB

2-Prop


Similar as 1st trick, it puts the cursor to change the type and after that change the property name itself. I found really cool when I used first.

It comes with many other flavor. Use propg  to create a auto implemented property with private set.

4- Second trick allows us to write auto-implemented property which requires less code but there could be many scenarios, when we need to write Full property definition that we used in earlier to C# 3.0 then use

propfull press TAB

3-propfull


Changing type and name can be done similar to above.

5- Need to write an indexer, use

indexer press TAB

indexer


6- Many times while code review we see that some part of code is not under try catch block or we need to write the block. Use

try press TAB

5-try


There is another flavor, if we just want try and finally then use tryf.

7- Want to create enum use

enum press TAB

enum-6


Similarly use struct to insert struct block.

8- Want to create switch block, use

switch press TAB

7-switch


Similarly use for, foreach, do, while etc to insert respective code blocks.

9- Many times we need to write our own custom exception class that should inherit from Exception class. It can written easily by

Exception press TAB

It creates a serializable class as

8- Exception


10- Want to override Equals method for your class. Use

equals press TAB

It will insert as

9-equals


11- To write static void main, use

svm press TAB

svm


Similarly you can use sim for static int main.

12 – last, many times we write console.writeline in our application. Just use

cw press TAB

10-cw


In this post, how can we save lots of keystrokes and time while writing some very common repetive code. This is not complete list but very common ones that can be used a lot in our day to day coding. if you know any other snippet which is very useful, do share in comments.

Cheers
Brij

Top 12 Visual Studio short cuts – Productivity Tips

Visual Studio is very Rich IDE and it provides in-numerous features that makes our day to day life easy. There are some very useful hot keys and tips which can increase our productivity significantly. Earlier I used few hot keys but recently I learned few which I found awesome which drastically reduce my time while writing/debugging/reviewing the code. So learn these and make a habit of these keys and feel super charged while writing code.

  1. While code review I find many time scattered and unaligned code which I hate. I use CTRL+K+D for aligning it.
  2. While debugging or testing the code, commenting/commenting codes are done a lot. Use CTRL+K+C/CTRL+K+U for the same.
  3. How do you up/down certain line of code. Select the code block and use ALT+up/down
  4. You have a used a lot F12 to go to Definition of class. Use CTRL – to go back.
  5. How do you resolve the classes by mouse click. Use CTRL+. to resolve it quickly.
  6. Refactoring is very important. Use CTRL+R+M for extracting a method.
  7. Find All References -> Use Shift + F12. Very helpful while debugging and fixing bugs.
  8. Want to put few lines of code in try block. Try Ctrl + K + S, it provides lot more options
  9. Ever tried selecting a rectangle code. Use ALT click drag.
  10. Lots of code in a single file. Use  CTRL + M + O and CTRL + M + X in collapse/expand code groups like regions, methods etc.
  11. Lots of code and there are no groups. Use CTRL+M+H/CTRL+M+U
  12. Another super sweet. ALT+F4 to close the window.

Try using the above in your day to day coding and be more productive.

Cheers
Brij


12 tips to increase the performance of ASP.NET application drastically – Part 2

This post is second part of my previous post where we discussed six tips to improve the performance of ASP.NET applications. In this post, we are going to discuss six more tips that could be another round a booster for your application performance. The link of previous post is below.

12 tips to increase the performance of ASP.NET application drastically – Part 1

  1.   Make your page asynchronous

IIS uses CLR thread pool to get a thread that processes a request that comes to the application. Say, if there are currently twenty threads available in pool, it means only twenty request can be served in parallel and if request processing takes some time then it could turn into disaster if hundred odd request are bombarded in few milliseconds. In this case…Read complete post on Infragistics blog

Routing not working when upgrading Angular library to 1.4 : Solution


I wrote a lot about AngularJS (18 articles till date) but recently I was working on a project where we upgraded the AngularJS library from 1.0 to 1.4 and found that many functionalities stopped working. Routing was one major part and one of my team member rushed me for a solution and then I realized the amount of changes.

One of the major changes, Routing is not part of the main Angular library and it needs to be added as external module. And we need to inject ngRoute if we want to use it. This changes took place in v1.2. In this post, I am considering that we are upgrading from 1.0.* to 1.4.* . I am taking example of one of my previous posts and upgrade that here. Both old and updated solution is attached. Let’s have a look again on the example screen

Continue reading

Asynchronous programming with async and await : explained

In one of my previous posts, I discussed about the synchronous and asynchronous programming model. We saw in details that how does it work in single and multi-threaded mode. This post is extension of that post and here we are going to discuss the two relatively new keyword async and await and how does that actually work. I got many questions around this so sharing it in details here. If you are not very clear about how synchronous and asynchronous programming works and how does it work in single and multi-threaded scenario then refer my previous post mentioned below.

Concurrency vs Multi-threading vs Asynchronous Programming : Explained

Continue reading

12 tips to increase the performance of ASP.NET application drastically – Part 1

Building web application and hosting it on a web server is insanely easy with ASP.NET and IIS. But there are lots of opportunities and hidden configurations which can be tweaked that can make it high performance web application. In this series post, we are going to discuss some of the most unused or ignored tricks which can be easily applied to any web application.

  1. Kernel mode cache – It is one of the primary tools widely used for writing making web application faster. But most of the times, we don’t use it optimally and just leave some major benefits. As each asp.net request goes through various stages, we can implement caching at various level as belowcachingoppWe can see that request is first received by http.sys so if it is cached at kernel level, then we can save most of the time spent on server as http.sys is a http listener which sits in OS kernel…Read complete post on Infragistics blog

Master Page, User Control, Custom Control and Content page : Order of page life cycle event

As we all know that while serving an asp.net request goes through many stages before it gets served. One of the important stages is, going through the page life cycle events. As a page can contain many other controls like User Control, Custom control etc and it can be a combination of master and content pages as well. As each control has its own life cycle so if they are inter weaved then it becomes very important to understand that how each event fits in complete lifecycle . Also this is one of the most asked question in asp.net interviews so I thought of explaining it.

Technically, Master page is nothing but a normal user control so you can treat it as user control used on a page and we will consider it same in our post. So we can say that there are two type of controls – User Control and Custom Control in a page. Content page is also nothing but a normal aspx page. Now to understand the order of events where all of these controls are available, lets first understand of the life cycle of each components individually.

Order

Note- I have not included all the events of life cycle only those are relevant at important to explain the topic. Continue reading