This post is second part of my post on Claim based Authentication. This part mainly discusses WIF and demonstrates a sample step by step. You all can access my first post from here.
Claim based Authentication and WIF
In my last post I discussed the problems of current day’s authentication implementation, details about Claim based authentication and basic components of Claim based authentication. Now in this post, I’ll discuss about Windows Identity Foundation and the main concepts one by one with a sample.
What is Windows Identity Foundation(WIF):
First of all. I’ll say Windows Identity Foundation is a Microsoft way to leverage the Claim based Authentication. Lets see the definition from msdn,
Windows Identity Foundation enables .NET developers to externalize identity logic from their application, improving developer productivity, enhancing application security, and enabling interoperability. Enjoy greater productivity, applying the same tools and programming model to build on-premises software as well as cloud services. Create more secure applications by reducing custom implementations and using a single simplified identity model based on claims. Enjoy greater flexibility in application deployment through interoperability based on industry standard protocols, allowing applications and identity infrastructure services to communicate via claims.
So we can say, Windows Identity foundation provides a set of classes which facilitates in implementing Claim based authentication.
Prerquisite:
To use WIF you need Windows 2003 server+ or Windows 7/8/Vista.
- WIF for Win server 2003 download it from
here
- WIF for Win 7+ download it from
here
- WIF SDK download it from
here
WIF SDK provides some visual studio template that helps in developing Claim
aware applications. These templates are
- ASP.NET Security Token Service Web Site
- Claims-aware ASP.NET Web Site
- Claims-aware WCF Service
- WCF Security Token Service
Above templates are available in New Website under File Menu.
Let’s discuss an Example
So today we will create an asp.net application(Relying Party Application-RP). And also
we’ll create a custom
Identity provider and we’ll use this identity provider for authentication of the user.
These are following main steps need to perform.
- Create a Custom Identity Provider
- Create an ASP.NET application
- Create a trust between Identity provider and ASP.NET application
So lets first create an Identity Provider
Creating a Custom Identity Provider
So here I will create a step by step process to create a Custom Identity Provider.
– Open Visual studio-> Create new website ->select ASP.NET Security Token Service Web Site (I have selected the location HTTP
to host it at IIS directly)

Now your sample Identity provider is created. It provides the basic infrastructure for you. It includes one login page that actually authenticates the user and here forms authentication is used.
Create an ASP.NET application( Relying Party – RP):
I have created an ASP.NET application as below.
 Now as this already create a inbuilt authentication module. You can remove it at all because we’ll not be using this. Or you can create an empty asp.net solution and some page as per needed. I have removed the account folder for the demo.
Create a trust between Identity provider and ASP.NET application(RP): This can be done using FedUtil provided by WIF SDK. Also from UI, we can add an STS reference in the ASP.NET website and make a trust relationship between Identity Provider and Relying Party. Look the following steps to add the reference
- Add a STS Reference to ASP.NET website

- This is First screen of FedUtil which displays the URI and location of ASP.NET website(RP)

- If you have not hosted your ASP.NET website(RP) on SSL it will the following Warning. At Production all the communication between Identity Provider and ASP.NET website(RP) should happen over SSL only. Here for demo purpose, I didn’t use SSL. I clicked on Yes.

- In this screen, It asks to select the STS ( Security Token Service). And has three option. As we have created the STS, we need to select the option “Use an existing STS”
 To build the trust relationship, we need to provide the federation metadata provided Identity Provider.
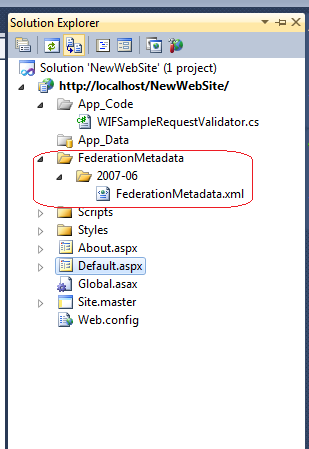
- Now we need to browse the FederationMetada xml file of the STS that we created.

FederationMetadata file resides in a special folder hierarchy “FederationMetadata/2007-06” under the STSWebsite physical folder.
- And Select the FederationMetdata. And Click next

- Again as my Security Token Service(STS) is not hosted at SSL. So it is showing the below warning
message. I just clicked Yes

- Here it asks if one wants to encrypt the token. It should be encrypted on production.You require to provide a certificate for the encryption. Here I have selected the option “No Encryption” for the demo.

- Now it shows all the claims passed by STS to RP. We can pass more claims from STS to RP as per our requirement. All the Claims is shown here while adding the STS reference at end. By default there are only two roles provided by STS (Name & Role)

- This is the Summary screen, shows the details about STS and RP. One need to review and click finish.
 Note: Here There is an option for to update the federation metadata on a routine basis. One need to know, if the STS is getting changes say Token or Claims etc. RP would only come to know about when federationmetadata will be updated, else say if someone removed a Claim and metadata is not updated it will allow to get the that Claim but actually at runtime you would nto get that claim which will not be a good condition.One should always have the metadata in updated form.
After clicking Finish. A folder FederationMetadata is added to ASP.NET website (Relying Party -RP) as below

Lets run the application:
Now if you run the application. It will throw an exception as
“Unable to evaluate expression because the code is optimized or a native frame is on top of the call stack.”
This is an issue with it and I have made a small post on it. You can get it resolved easily. Please check this
Now after changes it will run smoothly and It will take you at login page that is provided by STS. This is default login page provided STS, here you dont need to write password just put some name and click on login as below.

It will redirect to another page to STS which will actually initiate the process to create the token and claims. Then after creating it will be transferred to your website as authenticated user.
Now our application is running. As here in STS we have a sample login page the uses Forms authentication and by default authenticate every user. Here we can put our code, whether if we want to authenticate the user using windows authentication/Form authentication and use database this all we can and also we can get some data of the user from any store say DB here and that we can send using in Claims as per our requirement.
So Now here I’ll show, how to pass some more information to the user in Claims. So one can additional claims here. When you create a STS, there are four files get added in App_Code folder. One file named CustomSecurityTokenService.cs. In this file there is a method GetOutputClaimsIdentity actually creates the claims. We need to add the claims here ( I have added few)
             ///
<summary> /// This method returns the claims to be issued in the token.
 /// </summary>
    ///The caller's principal.
    ///The incoming RST, can be used to obtain addtional information.
    ///The scope information corresponding to this request.
    /// If 'principal' parameter is null.
    /// The outgoing claimsIdentity to be included in the issued token.
    protected override IClaimsIdentity GetOutputClaimsIdentity( IClaimsPrincipal principal, RequestSecurityToken request, Scope scope )
    {
        if ( null == principal )
        {
            throw new ArgumentNullException( "principal" );
        }
        IClaimsIdentity claimsIdentity = (IClaimsIdentity)principal.Identities[0];

        ClaimsIdentity outputIdentity = new ClaimsIdentity();

        // Issue custom claims.
        // Update the application's configuration file too to reflect new claims requirement.

        outputIdentity.Claims.Add( new Claim( System.IdentityModel.Claims.ClaimTypes.Name, principal.Identity.Name ) );

        outputIdentity.Claims.Add(new Claim(ClaimTypes.Role, "Manager"));
        //I added these custom claims
        outputIdentity.Claims.Add(new Claim(ClaimTypes.Email, "brij@gmail.com"));
        outputIdentity.Claims.Add(new Claim(ClaimTypes.Gender, "Male"));

        return outputIdentity;
    }
I have added two claims (Email, Gender )as above. These Claims will be available at ASP.NET website( Relying Party).
The same Identity provider can be used in multiple application.
Reading Claims at Relying Party(RP):
It’s easy to read the claims at Relying Party. To read the claims you need ClaimsIdentity of the logged in user and it is available in User Property. I have read the Claims at my page. I have created a dynamic table and shown the claim in that.
          IClaimsPrincipal claimsPrincipal = Page.User as IClaimsPrincipal;
        IClaimsIdentity claimsIdentity = (IClaimsIdentity)claimsPrincipal.Identity;

        // The code below shows claims found in the IClaimsIdentity.

        Table claimsTable = new Table();
        TableRow headerRow = new TableRow();

        TableCell claimTypeCell = new TableCell();
        claimTypeCell.Text = "Claim Type";
        claimTypeCell.BorderStyle = BorderStyle.Solid;

        TableCell claimValueCell = new TableCell();
        claimValueCell.Text = "Claim Value";
        claimValueCell.BorderStyle = BorderStyle.Solid;

        headerRow.Cells.Add(claimTypeCell);
        headerRow.Cells.Add(claimValueCell);
        claimsTable.Rows.Add(headerRow);

        TableRow newRow;
        TableCell newClaimTypeCell, newClaimValueCell;
        foreach (Claim claim in claimsIdentity.Claims)
        {
            newRow = new TableRow();
            newClaimTypeCell = new TableCell();
            newClaimTypeCell.Text = claim.ClaimType;

            newClaimValueCell = new TableCell();
            newClaimValueCell.Text = claim.Value;

            newRow.Cells.Add(newClaimTypeCell);
            newRow.Cells.Add(newClaimValueCell);

            claimsTable.Rows.Add(newRow);
        }

        divClaims.Controls.Add(claimsTable);
and now when you run the page it will be shown like

Now you can see that it is very easy to read the claims and this can be used in further processing.
I hope the above sample will help a lot. In my new post of this series. I will discuss another technique to implement use Claim based Authentication which is widely Used Called Identity Federation.
Thanks a lot


