Few ways of Handling Exceptions in ASP.NET MVC

Exception handling is one of the major areas of an application development and when it is a web application, it requires additional care so that errors gets handled gracefully without breaking the complete system and relevant information is shown to the users with proper error message. Also making sure that no internal details gets propagated till user when application crashes or error occur because it could be a major security threat. All the exception details and other additional information should be logged so that it can be later used for proper investigation. In this post we will talk about the few options available to handle the exception in ASP.NET MVC and best practices to use them.

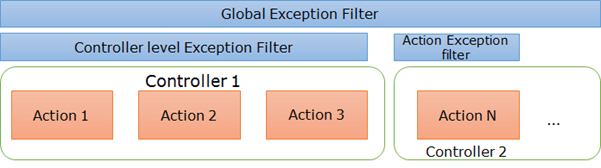
In ASP.NET MVC, the request first hits the route handler which identifies the controller and action to be serving the request. We put the whole logic in our controller itself. There are various type of filters in ASP.NET MVC that are also part of the request processing and some time we extend them to put some custom logic based on specific requirement. There is an Exception filter for handling exceptions as well and this Filter is key in handling exceptions in MVC. First let’s see available filters and their order of execution in request processing flow

orderoffilters

So we can see here that there are four filters in total and exception filter executes at end. It means if we use exception filter then it will be caught there whether the exception occurs in Action or even in Authorization/Action/Result filters.

Note – Filters are added as an attribute so it also inherits from ‘System.Attribute’.

Broadly we can say that exceptions may occur in controller or in some cases while processing the routes and filters. But as most of our core logic resides in action so the chances in are most. Before focusing on filters, let’s first discuss one basic way to handle to exception that is part of C#.

Using Try/Catch block

This is C# feature and one of the basic ways to handle exceptions so we can wrap all our code in our Action as below.

try
{
    // Add your code here
}
catch
{
    // Exception Handling code
} 

But there are many issues with this approach and the primary issue is the limitation to single Action. To handle that, we need to put try catch block in each Action of the application which is repeating the same exception handling code which defies the code re-usability logic. It does not mean that we should never use it but there are some scenarios where we require to perform some another activity in case of exception without letting the user know or more specifically if you are calling to some third part services etc. then it might be a good Idea to use this approach.

Global Error Handling

Global error handling is one of the simplest way to handle exceptions at application level. It leverages the Exception Filter to handle exception and applies at application level itself. This is out of the box feature and can be easily set up by following step.

  1. Set customErrors errors as On in web.config as
    <customErrors mode="On"></customErrors>
  2. Have a common error view (in Shared folder with name error.cshtml) which will be shown in case of error aserrorviewHere we see that we get a model of type HandleErrorInfo class which provides the details about that error occurred, controller and action name etc.
  3. Make sure we registere HandleErrorAttribute in Application_Start (Global.asax)method
    RegisterGlobalFilters(GlobalFilters.Filters);
    
    public static void RegisterGlobalFilters(GlobalFilterCollection filters)
    {
         filters.Add(new HandleErrorAttribute());
    }
    

    Now if any error occurs then error view will be shown.

Customizing global error handling

We have seen that how easily we can configure the error handling at application level. But what if we want to handle it bit differently. Say we want to save the details in database and/or want to send the email notification when error occurs. We have two options here

  1. Override OnException method :

    We can override OnException method as in our controller as

    protected override void OnException(ExceptionContext filterContext)
    {
        Exception ex = filterContext.Exception;
        // Log Exception ex in database
    
        // Notify  admin team
    
        filterContext.ExceptionHandled = true;
    
        // Setting the View in case of error
        filterContext.Result = new ViewResult()
        {
            ViewName = "CustomErrorView"
        };
    }
    

    Here we can log our exception, send the mail etc. and set our own view that will be shown (like here I used CustomErrorView) in case of error. But this code won’t be reusable and need to write in each controller wherever we need.

  2. To handle it in better way, we need to extend HandleErrorAttribute as
    public class MyCustomHandleErrorAttribute : HandleErrorAttribute
    {
        public override void OnException(ExceptionContext filterContext)
        {
                       Exception ex = filterContext.Exception;
                	     // Log Exception ex in database
    
                	     // Notify  admin team
    
                	     filterContext.ExceptionHandled = true;
    
    
            filterContext.ExceptionHandled = true;
    
            filterContext.Result = new ViewResult()
            {
                ViewName = "DVZ"
            };
        }
    }
    

    And instead of registering the default HandleErrorAttribute we need to register the custom one as

    filters.Add(new MyCustomHandleErrorAttribute());
    

    Now this custom error attribute will be used in the whole application.

Handling exception at more Granular level

Till now, we have seen that how can we apply filter at global level. MVC allows us to handle exceptions at more granular level similar at controller and action level as
granularexceptions

For Controller either we can use the default HandleErrorAttribute or we can use the extended attribute similar to MyCustomHandleErrorAttribute and put it at controller as

[MyCustomHandleError]
public class EventController : Controller
{
// Controller code
  	…
}

For Action

public class EventController : Controller
{
	[MyCustomHandleError]
public ActionResult About()
{
	// Action code
}
…
}

Note – Here I have put ‘MyCustomHandleError’ as an attribute. We can use default ‘HandleError’ attribute instead of custom one.

Another variation

There may be some scenarios where we may need to show specific view or details based on the type of exception occurs in Controller/Action. In other words, say if in Controller/Action, if a specific exception occurs, then showing user one view and any other exception occurs then show a different view. Let’s see an example

[HandleError(ExceptionType = typeof(DivideByZeroException), View = "DVZ")]
[MyCustomHandleError]
public ActionResult Create()
{
	// Action code
}

Here if DivideByZeroException occurs then view DVZ will be loaded else default one would be loaded. We can add as many type of exception based on requirement. Also similarly we can apply at Controller level as well.

ExceptionHandled property usage

In OnException method, you must have seen the following line many times.

filterContext.ExceptionHandled = true;

As the name suggests that when we set it true (default: false), then the exception does not propagate further and it is handled in the same method. Say we have put the Exception Filter at action, added a Global exception filer and we did not set the ExceptionHandled filter or set it false then once the exception is caught by action level exception filter that will be thrown further to next level and caught at global filter. Normally when we handle exception we make it false because we have already handled the exception. But there could be few scenarios where we do something with exception details and throw it further so accordingly we need to set this property.

Exception handling outside the scope of MVC

Exceptions are bound to happen and it can always find the way to reach user. We need to block every route. As we know handled the exceptions using MVC framework features but if something happens outside of the MVC scope. As we know that MVC framework is built on top of the ASP.NET platform then we can use the Application_Error method that is available since beginning to handle Application level error. It can be depicted pictorially as
aspnetnmvc

Here we can see that once the control reaches ASP.NET platform, this method can help us so we should handle the exception here as well and we can put all the logging and notification code here as

protected void Application_Error()
{
    Exception ex = Server.GetLastError();
    // Log Exception ex in database

    // Notify  admin team

    // Clear the error
    Server.ClearError();

    // Redirect to a landing page
    Response.Redirect("home/index");
}

Note: Application_Error should not be used in replacement MVC global exception filer, because as soon as you get out of MVC scope, you won’t get its execution context which is very important to provide the relevant details about the exception.

Conclusion

We have discussed various possible ways of handling exceptions. We find that all the exception handling moves around the handle error attribute with many variations. Another two that we discussed: using try catch block and using Application_Error. Best solution for any application would be a combination of these approaches like extend HandleErrorAttribute based on the requirement and use it accordingly. Application Error should be used as if an exception somehow find its way to get out from MVC scope, then it will be caught here. Try Catch block should be really avoided as it just not makes the code ugly but we can miss lots of relevant information that may be helpful in fixing the issue so unless specific case, do not use it.

Singleton vs Static class : Key Differences and Usages

The debate about Singleton vs Static is quite old and it is still continuing and there are lots of confusion around this as well. In this post, I am trying to explain these two concepts, key differences and its usages.In this post I will not focus on the basics of Static and Singleton and how to write that. If you are new to these keywords, I will advise you to learn about these first to get more benefited.

So first we are going to understand the characteristics of each . Lets start with static class

Static Class :

  1. Static classes cannot be instantiated so it restricts us in many ways like it cannot implement Interfaces, inherit any class etc.
  2. Any other scenarios where this keyword is required, it cannot be used like indexer etc. Also it cannot be used as method parameter, local variable etc for the same reason.
  3. Static classes can have only static members – constructor, fields, methods, properties, events.
  4. One cannot control when static constructors are called. It’s always earlier than first access of the class. So no parameters can be passed as well.

Internally when compiler compiles static class, it marks it as a abstract and sealed. So that no instance can be created and cannot be extended as well. Now let’s talk about Singleton

Singleton Class :

  1. As name suggests it allows to have only one instance of a class.
  2. The constructor of this class are marked as private so that accidentally one cannot create multiple instances and provides a static function/property which first create one instance and returns the same each time.
  3. As singleton is a normal class, it allows us to leverage all that features of object oriented programming concepts.

Memory Management :

There is much confusion around memory management of static class and Singleton class. In simple words, any class whether it is itself static or any member if marked as static then it would not be collected by Garbage Collector.

Static variables/classes are not stored in normal Heap and there is a separate space in memory to store static resources which holds the static classes and variables.This space is beyond the scope of GC and memory get release only when corresponding process/AppDomain unloads.

Because singleton holds a static reference which cannot be collected by GC so the instance cannot be collected and both (Static and Singleton) gets destroyed with the AppDomain/Process.

Some Key common characteristics :

  • As both of the static and singleton instances are have just one copy in memory throughout the whole application, both used for holding global state in an application.
  • Both are initialized lazily, it means for static classes it is initialized only when accessed first time and for Singleton, it gets created only when it is accessed first time.

The Differences

  1. Very first difference is that Static is a language feature and Singleton is a architectural pattern so both belongs to difference arena altogether.
  2. Now a days everybody is behind using Dependency Injection and Static does not fit there because it is interface driven.
  3. Unit Testing is another topic where you can find some way to create a mock for singleton instances but testing static is a nightmare.
  4. Being singleton is a just another class, it enable you to use Object oriented concepts.

Singleton approach is much more flexible as we can see that from the differences itself. We can use interface with it and implement it in a class and use in our application. If some requirement changes and later we require to change the logic then we can just remove the older implementation and replace with new one without hiccups as long as the interface is same.. Also testing is another key benefit.

Static classes is mainly recommended for having grouping of a bunch of utility methods that can be called independently but again testing could be a problem and benefits of OOP is gone. So most of the time static should be avoided.

Having said that using global variable (like static class or singleton) makes a strong coupling between the global data and all the places where it is used.

Cheers,
Brij


Issue while creating a stock like excel chart using PowerShell

Although this post is not in continuation of my previous posts on Excel charts and PowerShell but discusses a specific issue while creating Stock like chart. As topics are same I will advice you to go through the previous posts as I will be referring few things from that. The links of my previous posts are below

So to create a basic stock like chart we need to provide the data is a specific format.
b4-1

So lets write the script for the same

$xlChart=[Microsoft.Office.Interop.Excel.XLChartType]

$xl = new-object -ComObject Excel.Application   
$fileName = ''
$wb = $xl.Workbooks.Open($fileName) 
$wsData = $wb.WorkSheets.item(1) 

#Activating the Data sheet
$wsData.activate() 

#Selecting the source data - We cn select the first cell with Range and select CurrentRegion which selects theenire table
$DataforChart = $wsData.Range("A1").CurrentRegion

# Adding a new sheet where the chart would be created
$wsChart = $wb.Sheets.Add();
$wsChart.Name = "Charts"

#Adding the Charts
$stockChart = $wsChart.Shapes.AddChart().Chart

# Providing the chart types
$stockChart.ChartType = $xlChart::xlStockHLC

#Providing the source data
$stockChart.SetSourceData($DataforChart)

# Set it true if want to have chart Title
$stockChart.HasTitle = $true

# Providing the Title for the chart
$stockChart.ChartTitle.Text = "Stock like Chart"

# Setting up the position of chart (Not required if the sheet has just one chart). It will create the chart at top left corner
$wsChart.shapes.item("Chart 1").top = 0
$wsChart.shapes.item("Chart 1").left = 0

# Saving the sheet
$wb.Save();

# Closing the work book and xl
$wb.close() 
$xl.Quit()
# Releasting the com object
[System.Runtime.Interopservices.Marshal]::ReleaseComObject($xl)

So the above code looks fine as similar to our previous posts but when we run it throws an exception as
exceptionb4

It does not show any specific details for this exception and the error code also does not lead to any details but we do get default bar chart.

So it a look a little while to find the cause as it was not a common as for other charts it was working very smoothly.

For stock charts, it expects the data before providing chart types so if we change the below lines


# Providing the chart types
$stockChart.ChartType = $xlChart::xlStockHLC

#Providing the source data
$stockChart.SetSourceData($DataforChart)

to


# Providing the source data
$stockChart.SetSourceData($DataforChart)

# Providing the chart types
$stockChart.ChartType = $xlChart::xlStockHLC

Its starts running. Let’s see a quick look on resultant chart
stock-chart

So it was very peculiar as the resolution does not seem to have any logic but next time you face similar issue, it may be helpful.

Cheers,
Brij

How to create Excel Chart using PowerShell – Part 3

This post is in continuation of my previous two posts on creating excel chart using PowerShell and in the first post we created a basic chart then in the next post we we added some more features to our chart and added two charts. The link of the previous posts are given below

Today we will see some more useful features.

Let’s first discuss the chart types. In our previous post, we created two charts in which first one was Bar chart which was default and second one was line where we provided the chart type as 4 which turned into Line chart. The better way to use the chart enums for that. To use that first we need to get the chart type as

$xlChart=[Microsoft.Office.Interop.Excel.XLChartType]

Now we can assign the chart type as

$chart.ChartType=$xlChart::xlBarClustered

One key difference here is property name casing, when we provide the number it was chartType and now ChartType which takes enum as above.

Note- It may not work for you as is as show that it is not able to load/recognize Microsoft.Office.Interop.Excel.XLChartType so you need to add the type as

<em>Add-Type -AssemblyName Microsoft.Office.Interop.Excel</em>
/sourcecode]
In our example, I have chart types as

$firstChart.ChartType = $xlChart::xlBarClustered
$secondChart.ChartType = $xlChart::xlLine
$thirdChart.ChartType = $xlChart::xlAreaStacked

It looks more professional. To know the complete list of chart types click here

In this post, we will create three different charts and put it in a new sheet. Adding a sheet in the excel is pretty simple and can be added as

$wsChart = $wb.Sheets.Add();
$wsChart.Name = "Charts"

In the second line, I have provided the sheet name.

Now we will be adding charts in this new sheet as

$firstChart = $wsChart.Shapes.AddChart().Chart
$secondChart = $wsChart.Shapes.AddChart().Chart
$thirdChart = $wsChart.Shapes.AddChart().Chart

So lets just see the data in our sheet

dataforchart-3

Now let’s run script and see the charts

threecharts

So lets see the complete script

$xlChart=[Microsoft.Office.Interop.Excel.XLChartType]

$xl = new-object -ComObject Excel.Application   
$fileName = ''
$wb = $xl.Workbooks.Open($fileName) 
$wsData = $wb.WorkSheets.item(1) 

#Activating the Data sheet
$wsData.activate() 

#Selecting the source data - We cn select the first cell with Range and select CurrentRegion which selects theenire table
$DataforFirstChart = $wsData.Range("A1").CurrentRegion
$DataforSecondChart = $wsData.Range("A11").CurrentRegion
$DataforThirdChart = $wsData.Range("A21").CurrentRegion

# Adding a new sheet where the chart would be created
$wsChart = $wb.Sheets.Add();
$wsChart.Name = "Charts"

#Adding the Charts
$firstChart = $wsChart.Shapes.AddChart().Chart
$secondChart = $wsChart.Shapes.AddChart().Chart
$thirdChart = $wsChart.Shapes.AddChart().Chart

# Providing the chart types
$firstChart.ChartType = $xlChart::xlBarClustered
$secondChart.ChartType = $xlChart::xlLine
$thirdChart.ChartType = $xlChart::xlAreaStacked

#Providing the source data
$firstChart.SetSourceData($DataforFirstChart)
$secondChart.SetSourceData($DataforSecondChart)
$thirdChart.SetSourceData($DataforThirdChart)

# Set it true if want to have chart Title
$firstChart.HasTitle = $true
$secondChart.HasTitle = $true
$thirdChart.HasTitle = $true

# Providing the Title for the chart
$firstChart.ChartTitle.Text = "Domain controller's usage- Bar Chart"
$secondChart.ChartTitle.Text = "Events- Line Chart"
$thirdChart.ChartTitle.Text = "Events Daily- Stacked Area Chart"

# Setting up the position of chart (Not required if the sheet has just one chart). It will create the chart at top left corner
$wsChart.shapes.item("Chart 1").top = 0
$wsChart.shapes.item("Chart 1").left = 0

$wsChart.shapes.item("Chart 2").top = 250
$wsChart.shapes.item("Chart 2").left = 0

$wsChart.shapes.item("Chart 3").top = 500
$wsChart.shapes.item("Chart 3").left = 0


# Saving the sheet
$wb.Save();

# Closing the work book and xl
$wb.close() 
$xl.Quit()
# Releasting the com object
[System.Runtime.Interopservices.Marshal]::ReleaseComObject($xl)

Above script is self explanatory. We provided different positions (top and left) for each chart so that it gets located at properly on sheet.There are more customizations available which we can use based on our need.

Cheers,
Brij

How to create Excel Chart using PowerShell – Part 2

This post is in continuation of my previous post on creating excel charts using PowerShell where we discussed how can we create a basic excel chart. Refer below link for first post

How to create Excel Chart using PowerShell – Part 1

Today we will see some more useful features. Let me start with a question

What if there are multiple data sets available in the sheet?

As in previous post, we didn’t provide any data source to the chart but in an ideal case we should. Now we have multiple sets of data and we want to create a chart based on each set. Say our sheet looks like

MultipleSetofData

We want to create two charts based on the two data tables as above. So we need to provide it as a data source. The easy way to select data, is using the current region property. Lets see that

#Select the first cell via Range and select CurrentRegion which selects the entire table
$DataforFirstChart = $wsData.Range("A1").CurrentRegion

Here we DataforFirstChart refers the first table. A1 is the first cell of the table and current region returns the complete table. Similarly we can get the second table

$DataforSecondChart = $wsData.Range("A11").CurrentRegion

First cell of the second table is A11 so we used the same.

As we are going to create two charts we need to define the positions as well. It provides two properties top and left which can be used as

$wschart.shapes.item("Chart 1").top = 0
$wschart.shapes.item("Chart 1").left = 0

What about chart types? In previous post, we didn’t provide any chart type and by default the bar chart was rendered. We can provide the chart type based on our requirement. We will set the second chart as Line chart and we will discuss it in bit more details in next post.

$secondChart.chartType = 4

So let’s the complete code

$xl = new-object -ComObject Excel.Application	
$fileName = 'D:\TestP\DataforCharts.xlsx'
$wb = $xl.Workbooks.Open($fileName)	
$wsData = $wb.WorkSheets.item(1) 

# Activating the Data sheet
$wsData.activate() 

# Selecting the source data - We cn select the first cell with Range and select CurrentRegion 
# which selects the entire table
$DataforFirstChart = $wsData.Range("A1").CurrentRegion
$DataforSecondChart = $wsData.Range("A11").CurrentRegion

# Adding the Charts
$firstChart = $wsData.Shapes.AddChart().Chart
$secondChart = $wsData.Shapes.AddChart().Chart

# Providing the chart type - Line chart
$secondChart.chartType = 4

# Providing the source data
$firstChart.SetSourceData($DataforFirstChart)
$secondChart.SetSourceData($DataforSecondChart)

# Set it true if want to have chart Title
$firstChart.HasTitle = $true
$secondChart.HasTitle = $true

# Providing the Title for the chart
$firstChart.ChartTitle.Text = "Domain controller's usage- Bar Chart"
$secondChart.ChartTitle.Text = "Events- Line Chart"

# Setting up the position of chart (Not required if the sheet has just one chart). 
# It will create the chart at top left corner
$wsData.shapes.item("Chart 1").top = 0
$wsData.shapes.item("Chart 1").left = 350

$wsData.shapes.item("Chart 2").top = 250
$wsData.shapes.item("Chart 2").left = 350

# Saving the sheet
$wb.Save();

# Closing the work book and xl
$wb.close()	
$xl.Quit()
# Releasting the xl object
[System.Runtime.Interopservices.Marshal]::ReleaseComObject($xl)

Above code is self explanatory, we provided different positions for the both charts. Now it’s time to run the script and see the output.

multichart-b2

Awesome, so we can see two charts one is Bar and another line chart as expected. In the next post, we will add some more features to it and see more options.

Cheers,
Brij

How to create Excel Chart using PowerShell – Part 1

Recently, I had to automate a complete test suite for a very complex system which uses lot of internal and external tools and generate different kind of reports. PowerShell is a primary tool for writing the automation scripts so we started using it. I found it very powerful although any nice editor (free) or proper documentation, best practices etc not available. So I explored many things with my team and I will be sharing few things here. In the coming couple of posts, I will discuss about creating excel charts using PowerShell  and in this post we will start with creating a basic chart.

To create a chart, we need the data in a tabular format which is to be used to create a chart. Lets understand what all basic steps need to be followed for creating the chart.

  • Open the excel and correct sheet .
  • Add a new sheet (Optional)
  • Provide the name to sheet (Optional)
  • Add a chart in the sheet
  • Set the Title if required
  • Save the excel
  • Releasing the com objects

Now let’s go straight to the example. Say we have a excel with data like this

chartExcel

Now its time to see the real script. Refer inline comments for detail

# Creating excel com object
$xl = new-object -ComObject Excel.Application   
$fileName = <path of the excel file>
$wb = $xl.Workbooks.Open($fileName)
#Open the first sheet of the excel 
$wsChart = $wb.WorkSheets.item(1) 

# Activating the Data sheet
$wsChart.activate() 

# Adding the Chart
$chart = $wsChart.Shapes.AddChart().Chart

# Set it true if want to have chart Title
$chart.HasTitle = $true

# Providing the Title for the chart
$chart.ChartTitle.Text = "Domain controller's usage"

# Save the sheet
$wb.Save()  

# Closing the work book and xl
$wb.close() 
$xl.Quit()
# Releasting the excel com object
[System.Runtime.Interopservices.Marshal]::ReleaseComObject($xl)

Now its time to run the script and see the chart.

barchart

Looking perfect.

Note – You may not be able to run the script as it may show the script execution permission denied. For that you need to run the following command (Details here).

Set-ExecutionPolicy Unrestricted

Above code is pretty basic and there are couple of things which is taken by default like Chart Type (which is Bar chart), Data range used for chart (Since single data set is present), position of the chart etc.

In the next post, we will take a step further and use more APIs.

Cheers,
Brij


Learning ASP.NET Web API [Packt] – ASP.NET Core RC1 to ASP.NET Core 1.0

Hello All,

Recently, I published a video course on ASP.NET Web API using ASP.NET Core framework. Initially, when I started working on it, it was named as ASP.NET 5 and as it progressed till last section, Microsoft announced to rename it as ASP.NET Core and RC2 got released few days prior to the course release date. Microsoft took more than six months to release the next RC version. Although the concept was same but there were major changes in tooling and libraries. As it was not the final version so we decided to provide the details of differences once RTM releases.

In this post, I will be putting the details of the changes by section and also update the sample which will be available with the course. As ASP.NET 5 got renamed to ASP.NET Core, accordingly the names of libraries got changed to ASP.NET Core as well so we need to change all the references. The following table contains the details of packages that we need to update in our sample with the video number.

ASP.NET 5 Reference (Earlier) ASP.NET Core 1.0 Reference (Current) Video#
Microsoft.AspNet.Mvc Microsoft.ASPNETCore.MVC 2.2
EntityFramework.Core
EntityFramework.MicrosoftSqlServer
Microsoft.EntityFrameworkCore
Microsoft.EntityFrameworkCore.SqlServer
2.3
Microsoft.AspNet.Mvc.Formatters.Xml Microsoft.AspNetCore.Mvc.Formatters.Xml 2.4
Microsoft.AspNet.Mvc.TagHelpers
Microsoft.AspNet.Identity.EntityFramework
Microsoft.AspNetCore.Mvc.TagHelpers
Microsoft.AspNetCore.Identity.EntityFrameworkCore
5.4

Updated sample is available with the course and refer the project.json to find the updated references. Also, Microsoft again reintroduced web.config file but it will be there along with Project.json.

Note – The details will be included for only for those those sections where changes are required.

Section 2   
As this was the first section where we started our discussion on ASP.NET Core Web API and started working on our sample so this section got many changes. Let’s discuss each

Video 2.1 : There are changes in the project creation flow. Earlier when we used to create ASP.NET Core project, it used to have two sets of references – one for core and other for full framework. We either used to build the application using both the framework and remove one based on our needs. As there were many libraries which could not work in both the platforms so Microsoft has provided the option to select the framework upfront while creating the project which makes the complete process simpler. Also, in real world scenarios, there are rare chances when we need to build the binaries for both the framework.  Now when we open New Project window and select web from left side then we get three options as
2.1Here we have three options.

  1. First one is a traditional ASP.NET application using .NET 4.6.
  2. Selected one is ASP.NET Core application using .NET Core framework and the same is used in our course.
  3. Third one is again ASP.NET Core application but uses the standard .NET framework.

When we select the second option, it shows the following dialog

2.1_2

It also got revamped completely. We had earlier lots of options which included standard ASP.NET templates. Now it contains only ASP.NET Core templates and has three options same as earlier ASP.NET 5 templates and we used the empty template for our course. Just to mention again, now we have just one bag named as .NETCoreApp,Version=v1.0  which contains set of libraries for .NET Core only in the references.

There are some more changes as below

a) Earlier we used to have following line in startup.cs which was entry point for the web application

// Entry point for the application.
public static void Main(string[] args) => WebApplication.Run<Startup>(args);

but now we have a new file program.cs which contains the main method which is now entry point for the web application.

b) Configuration file web.config is also back in project file and available along with project.json although all the settings should be put in project.json and we will be using the same.

c) There are also changes in the number of the parameters in ConfigureServices method in startup.cs which includes Hosting Environment and logger factory but we will not be using it in our sample.

Video 2.2: Only change in the references. Refer the initial table.

Video 2.3: In this video, we discussed that there are four options to register a service but we found AddSingleton and AddInstance very similar, both allows single instance across multiple requests with a difference in the instance creation. Now we have only AddSingleton where either we can pass the instance or provide the type info as.

To register via interface and class name

services.AddSingleton<IBookStoreRepository, BookStoreRepository>();

and to register an instance

IBookStoreRepository bookStoreRepository = new BookStoreRepository(new BookStoreContext());
services.AddSingleton(bookStoreRepository);

Video 2.4: Only change in the references. Refer the table.

Section 3
In this section we added CRUD operations to our sample using  HTTP verbs. Only few changes are required in the section as mentioned below.

Video 3.2: Microsoft did an awesome change with it by making the JSON response in camel case by default. In our sample we added serialize settings in statrtup.cs as

options.SerializerSettings.ContractResolver = new CamelCasePropertyNamesContractResolver();

It is no more required.

Video 3.3 :  We returned various status codes from the action methods based on the request.The classes that we used also got renamed as

ASP.NET 5 ASP.NET Core 1.0
HttpUnauthorized Unauthorized
HttpNotFound (and its overloads) NotFound
HttpBadRequest (and its overloads) BadRequest

The above changes has taken place in all the action methods wherever used.

Section 4 
In this section, we added few more features to our sample like sorting, paging etc. Here there is a change in the way we access URL Helper as discussed below.

Video 4.3: We used URL helper for generating the URLs and it was injected via constructor without any other changes as it was by default available which is not the case now.

Now we need to access it via UrlHelperFactory and action context. ActionContext is accessed via ActionContextAccessor, for that we need to register it in startup.cs as

services.AddSingleton<IActionContextAccessor, ActionContextAccessor>();

and we need to inject the UrlHelperFactory and ActionContextAccessor in constructor to get the URL helper as

  public BooksController(IBookStoreRepository _repository, IUrlHelperFactory urlHelperFactory, IActionContextAccessor actionContextAccessor)
        {
            this.repository = _repository;
            this.urlHelper = urlHelperFactory.GetUrlHelper(actionContextAccessor.ActionContext);
        }

Rest of the code would be same as we got the similar URL helper.

Section 5
In this section we talked about security implementation. In it we have only few changes as below.

Video 5.2 : We created a custom authorization attribute RequireHttpsAttribute which inherited from AuthorizationFilterAttribute where we checked the scheme from the URL. Now RequireHttpsAttribute is itself available under the namespace Microsoft.AspNetCore.Mvc so we can use the same to enforce the SSL in complete application or any specific controller/action.

Video 5.4 : Only few references changes. Refer the table

Section 6 
In this section, we discussed some advanced topics like DI, CORS etc and there are few changes in DI. Let’s see that

Video 6.1:
a) As discussed earlier that now we don’t have AddInstance option for registering the service, same can be achieved via AddSingleton.

b) We discussed that we can also inject services via property using FromServices attribute but it is not available any more as it was creating confusion and issues. Constructor injection is always preferable. From services is available and can be used for Action Injection as

public IEnumerable<Book> Get([FromServices] IBookStoreRepository repository)
{
...
}

These are the key changes that took place specific to Web API and our course. I created again the sample from scratch using the ASP.NET Core 1.0 which can be downloaded from the course.

Thanks a lot for your support and feedback.

Cheers
Brij

How to test email functionality without configuring Smtp Client

Writing code for sending mail is one of the common tasks that we need to work every now and again. Sometimes it is one of the requirements in our application and some time we develop to send alerts to all when application looses its control on production :).

.NET made it very simple to send the mail which normally looks a complicated task. We can easily write 4-5 lines of the code to send the mail. Lets just have a look on a sample code

Continue reading

Getting Started with TypeScript: Angular 2 (1/N)

Hello All,

Thanks a lot to all of you for liking my first AngularJS 1.X series and I am very glad to receive thousands of responses and feedback. I was planning to write the similar series on Angular 2 but got bit busy with various things. Also I was working on a course on ASP.NET Web API using ASP.NET Core which you can find at Learning ASP.NET Web API. In the mean time so many blog readers requested me for the same. Today I am going to write first post on Angular 2, specifically Typescript.

Download the pdf version of my AngularJS 1.X series from here.

As Angular 2 was first announced by Google around two years back in 2014 since then various changes has taken place in the framework and continuing. The final release is yet to be out. Due to the kind of breaking changes with previous version it is introducing, initially there were lots of apprehensions in the community around it. But the Angular team has successfully addressed most of the concerns as the times passed. Now it is approaching to final release and we already have couple of RC releases so we are not too late with it. But it is high time to start.

Why Angular 2?

It is one of the most asked questions about Angular 2. As we have already a robust framework (AngularJS 1.X) which is serving the purpose quite beautifully for small to large enterprises, do we need this kind of changes at all?

The answer is Yes. There are quite a few reasons. Let’s see that

  1. There are major performance improvements in all the areas whether it is bootstrapping, Data binding, event handling etc. Leveraging Web workers and using other libraries also got simplified.
  2. As this is the age of mobile, Angular 2 has been developed by keeping it mind since beginning. The same code renders differently based on browser or mobile app.
  3. One of the hardest things to understand in Angular 1 was $scope which is no more in Angular 2. Angular 2 uses zone.js for the change detection.
  4. No more controllers and we will deal with Components here
  5. Write less code with Typescript and leverage the OOPs concept.

So we have seen some of the key benefits of Angular 2 but it does not mean you just upgrade the Angular 1 to 2. As it is completely new framework with little commonalities with previous one, it is advised to use it with new applications while old one can happily use Angular 1 without any issue.

How to start with Angular 2?

In AngularJS 1.X, we have used plain JavaScript for writing the code but as we are seeing for long, writing JavaScript code for enterprise level applications is quite tough and become unmanageable as the time passes. Even for small applications as they grow, it becomes tough to manage. Angular 1.X resolves this problem a bit by structuring the code and writing loosely coupled system. But JavaScript itself is not a type-safe language and does not allow features of OOPs. To overcome these problems, Angular Team announced AtScript at ngEurope conference in Sep 2014 and shared the new (Angular 2) framework is developed using it. Microsoft was also working on similar language TypeScript so both got together and in March 2015, they announced that the features of AtScript will be available in TypeScript 1.5 and the complete Angular 2 framework got built using TypeScript.

ECMA which defines the standards for JavaScript also understood the challenges of it and came ECMA 6 (June 2015) which includes the concept of classes, modules etc. and ECMA 7 in June 2016. Lets see how does all fit together.

Typescript

We can see that TypeScript is super set of all, it means we can leverage the features of all the standards and languages. But currently most of the browsers supports the ECMA 5 only, it means our code cannot run as is. For that we have few compilers like tsc, webpack which compiles the typescript code to normal JavaScript so that it can run smoothly in all browsers.

As Typescript and AngularJS looks made for each other so we will use TypeScript for writing Angular 2 code and in our initial posts we will discuss some core concepts of Typescript and then introduce Angular 2. After learning basics of TypeScript, learning Angular would be very easy.

We will start learning the Class. Yes you have read it correctly. Class is new construct that got introduced with ECMA 6 and further more features are added via TypeScript.

Choosing Editor

So what editor should we use for the same. There are various options and some of them mostly used are

  1. Visual Studio 2013/2015,
  2. Visual Studio Code/Community (free)
  3. Sublime
  4. WebStorm and many more

You can use any of it. You can go for Sublime if never used Visual Studio or you can try Visual Studio community version which is free. For more details and how to use these editors, refer here.

I will be using Visual Studio and for that you just need to install a plugin and it provides very rich editor with all intellisense support and compile time errors.

Creating Class

Classes in typescript is almost similar to C# but here it is more flexible and requires less code. So let’s our first class

class Person {
    // Three properties which is by default public.
    // Types are written after the variable using the separator :
    firstName: string;
    middleName: string;
    lastName: string;

    // Class constructor accepting three parameters. 
    constructor(firstName: string, middleName: string, lastName: string) {
        this.firstName = firstName;
        this.middleName = middleName;
        this.lastName = lastName;
    }

    // Member function of the class
    getFullName() {
        let fullName = this.firstName + ' ' + this.middleName + ' ' + this.lastName;
        return fullName;
    }
}

We have written a class Person which has three properties firstName, middleName and lastName. In this type of variables are provided after the writing itsname with a sperator “:”. All the members are by default public so these can be accessed and updated using class instance. Then we wrote constructor using the keyword constructor which accepts three parameters and initialize the internal properties. Here you can see the similar this keyword as C# which refers to current instance of the class. Also I added another method getFullName which just concatenates all the three properties and returns full name. Here you can see that we don’t need to write any keyword like function etc so we can see that it requires a lot less code and more contextual keywords.

let person = new Person("Brij", "Bhushan", "Mishra");
console.log("Mr " + person.lastName);
console.log(person.getFullName());

Now creating instance of the class is similar to C# using new keyword with passing all the parameters in constructor. As we have just one constructor we would not able to create instance by parameter less constructor. We also see another keyword let which I am using instead of var, we will discuss the differences in some later post but let should be preferred. Calling method is simple and here we just printed values in console.

Using Inheritance

Inheritance is well supported in TypeScript so we can easily extends any class. Here we need to extens keyword instead ‘:’ used in C#. Let’s extends our person class and create Employee class

class Employee extends Person {
    // Two more properties added
    employeeId: string;
    salary: number;

    // Constructor takes five parameters now. Three from base class and two derived class
    constructor(firstName: string, middleName: string, lastName: string, 
                employeeId: string, salary: number)
    {
        super(firstName, middleName, lastName) 
        this.employeeId = employeeId;
        this.salary = salary;
    }

    getSalary() {
        return this.salary;
    }
}

As mentioned earlier, extends keyword got used for for deriving a new class. In the constructor, we used another keyword Super to call the base class constructor and that should be called inside the constructor, not after the colon (:) as C#. There we also required to use base keyword for the same.

Implementing Interface

We can also create interface and that may be implemented in a class. Let’s create an interface IBonusCalculator as

interface IBonusCalculater {
    getBonus()  
}

It is similar to C# and have just one method getBonus. To implement it, we need to use implements keyword. Let’s implement it in our Employee class

class Employee extends Person implements IBonusCalculater {
    // Two more properties added
    employeeId: string;
    salary: number;

    // Constructor takes five parameters now. Three from base class and two derived class
    constructor(firstName: string, middleName: string, lastName: string, employeeId: string, salary: number)
    {
        super(firstName, middleName, lastName) 
        this.employeeId = employeeId;
        this.salary = salary;
    }

    getSalary() {
        return this.salary;
    }

    // Implementing IBonusCalculater's method
    getBonus() {
        return this.salary * 0.3;
    }
}

So we have seen that Class in typescript provides all the key features of OOPs and uses more relevant keywords like extends, implements, constructor etc than C# which makes it more developer friendly and readable.

Now I am going the last topic which will make you excited.  Say we have two classes and there instances

class Book {
    name: string;  
}
class Video {
    name: string;
}

Are both different type. Let’s see this

let b = new Book();
b.name = "HTML and CSS";

let v = new Video();
v.name = "Learning ASP.NET Web API";

function PrintName(b : Book) {
    console.log(b.name);
 
}

PrintName(b);
PrintName(v);

Will it compile?

Yes and run without any error. Surprised.

It will print the book and video name accordingly. Typescript checks the property names for Type comparison. I find it more useful as although they are different classes but behind the scene both are same. If we add some another property in Book only then it will throw an error because the type of parameter is Book and when video does not have the property while vice versa works but we will not be access the new property of video.

Conclusion

In this post, We have started with little bit history of Angular 2 and discussed that how TypeScript became the primary language for Angular 2. We saw that TypeScript is superset of JavaScript including ECMA 6, ECMA 7 standards and ultimately it is converted in normal JavaScript file which is compatible with every browser. We discussed the first key concept Class with example and later we saw the most important thing that two different class with same properties are considered similar here. In the next post, we will discuss about Decorator and Components.

Cheers,
Brij

Received Microsoft MVP award sixth time in a Row

Hello All,

MVP_Logo_Horizontal_Preferred_Cyan300_RGB_300ppiAgain, with all of your support and feedback, I have been awarded Microsoft Most Valuable Professional award sixth time consecutively. Its really a great achievement for me and all the kudos goes to my readers, conference audiences and supporters.

I received my first award on July 2011 in ASP.NET/IIS category for the first five years. Now it got merged with other related categories and renamed as Visual Studio and Development Technologies. ASP.NET has always been close to me and if you have been following the latest changes in the framework which is ASP.NET Core then you will find it totally awesome. It’s modular, leaner, completely customizable and blazing fast which makes it closer to me. Last month, Packt published a Video Course on ASP.NET Web API using ASP.NET Core framework. I would encourage you to have a look on it.

I have been receiving lots of queries regarding Microsoft MVP program specially last couple of months so If you have any query or want any specific detail, do ask in the comment. I will answer there, so it will be useful to everybody.

Again thanks a lot to all of you. Do keep sharing your feedback and ask any specific question regarding MVP program here.

Cheers,
Brij