Writing Asynchronous Web Pages with ASP.NET- Part 3

This is third post in the series of Writing Asynchronous Web Pages with ASP.NET. In first post, We discussed briefly about various asynchronous patterns and wrote an asynchronous web Page using APM model. In second part, we used Event-based asynchronous pattern (EAP) and discussed it with a example. Please find the links of my earlier post below.

  1. Writing Asynchronous Web Pages with ASP.NET- Part 1
  2. Writing Asynchronous Web Pages with ASP.NET- Part 2


In this post, we are going to use another pattern. .NET 4.0 introduced Task Parallel Library (TPL), which simplified the way to write asynchronous code. Let’s briefly understand the TPL. It provides a method (as naming convention method name ends with async) which returns a Task (or Task<TResult>) .

Task represents an asynchronous operation which contains the Result once completes. After getting the task, we can do some other activity and can keep checking the status of the Task. Once it completes, read the result from the Task.

We can provide an asynchronous method in our class that provides an async method that returns a task as

public class MyCustomClass
{
    public Task<int> ReadAsync(byte[] buffer, int offeset, int count);
}

Task actually internally uses Thread Pool and a thread is allocated to the task using thread pool to complete the task but all this complexity is hidden from the user and .NET itself lays down the required infrastructure for this.

Now, scores of classes in .NET libraries supports this pattern and we can make use of that.

.NET4.5 made our life much easier by introducing to keywords async and await which allows us to write the asynchronous code in a synchronous way. All the other required basic activities like context switching etc are taken care by the .NET framework for us. These keywords are provided over Task Parallel Library  that got introduced in .NET 4.0. Writing asynchronous activities with these keywords are highly optimized, performance oriented and make best use of TPL.

Now let’s use this pattern and write another asynchronous page. So in this examples, I am using a WCF service that returns a list of Employees and that is getting displayed on the web page. So our Page_Load method could look like

protected async void Page_Load(object sender, EventArgs e)
{
    WcfService.Service1Client client = new Service1Client();

    var customers = await client.GetEmployeesAsync();
    gdCustomers.DataSource = customers;
    gdCustomers.DataBind();
}

So as we see here that my service supports the TPL, async and await keywords based asynchronous pattern.

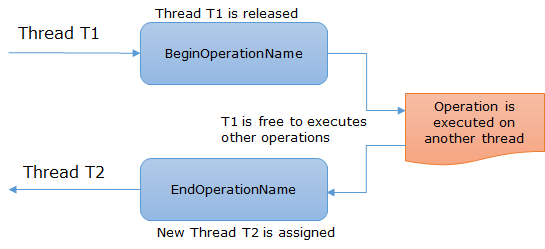
In page life cycle, when Page_load gets fired, ASP.NET finds it async and when it reaches to await, it releases the current thread and a new thread is picked from the thread pool to continue the activity and the call the web service took place asynchronously. Once the data returns from service, the same UI thread is assigned to execute further.
But there is better way to use async and await in web page. This has an issue as well and execute the code in synchronous mode . As we know our page life cycle has a set of events that gets fired in a predefined order and next event will be fired only when the last event completes. So if we use the above way of async Page_Load, this event will be fired during page life cycle event once it reaches to async, current thread gets free and a another thread got assigned to complete the task asynchronously, but the ASP.NET cannot execute the next event in life cycle because Page_Load has not been completed yet. And underlying synchronization context waits till the asynchronous activity completes. Then only the next event of page lifecycle will be fired which makes the whole process in synchronous mode only.

So to avoid it, there is a better is available. So the new way uses ASP.NET method RegisterAsyncTask which takes PageAsyncTask as a parameter. So let’s write the code then we’ll discuss that How does it work?

protected void Page_Load(object sender, EventArgs e)
        {
            RegisterAsyncTask(new PageAsyncTask(async () =>
            {
                using (Service1Client client = new Service1Client())
                {

                    var customers = await client.GetEmployeesAsync();
                    gdCustomers.DataSource = customers;
                    gdCustomers.DataBind();
                }
            }));
        }

Here, we have register a delegate using method RegisterAsyncTask at Page_Load. It does not fire the event while running the Page_Load event. Here it just register an event and tell the ASP.NET to execute it. Now as we have already marked page as async, ASP.NET itself decides the best time to execute it asynchronously and Page Life cycle events gets fired as usual without waiting for the async task to complete. This is very useful in the scenarios where we want to run multiple asynchronous tasks. Multiple tasks can run parallel if required. So now we have given the liberty to ASP.NET to execute this task asynchronously rather than waiting for the async task to get it completed then fire the next page life cycle events.

Hope you have enjoyed the post.

Cheers,
Brij

Writing Asynchronous Web Pages with ASP.NET- Part 2

This is the second part in the series of Writing Asynchronous web pages in ASP.NET. In my last post, we discussed about various programming model for writing asynchronous code and wrote a asynchronous page using Asynchronous Programming model(APM). The link of part-1 of the series is given below

Writing Asynchronous Web Pages with ASP.NET- Part 1

In this post we’ll use another approach that is Event-based asynchronous pattern(EAP).

What is Event-based asynchronous Pattern (EAP)?

This model provides another way to write asynchronous code. In this pattern, it provides one void method (as a naming convention method name ends with async) and one or more events to notify the caller that there is a change in status. It means we don’t need to keep checking the status of the task, an event will be raised once the task will be completed. This asynchronous task runs in the background and simplest one, uses BackgroundWorker class to implement.

Any class that provides the capability to call its method asynchronously (using EAP model), provides a method that ends with async (naming convention) and an event that notifies when the task completes. It can provide more events to provide the status of the thread. We should follow these rules in our class if we want to write our own custom asynchronous methods that uses EAP Model.

So let’s create a class that uses this pattern

public class MyCustomClass
{
    public void ReadCharCountAsync(byte[] buffee, int offset, int count);
    public event ReadCompletedEventHandler ReadCompleted;
}

public delegate void ReadCompletedEventHandler(object sender, ReadCompletedEventArgs readCompletedEventArgs);

public class ReadCompletedEventArgs : AsyncCompletedEventArgs
{
    public int Result { get; }
}

We can see here that my class has one async method and one event handler. Then we defined the event handler and event arguments which contains the result of the method.

In this post, I’ll be using a .NET class WebClient that provides a method that can consumed asynchronously using EAP model. In this example, I am just downloading a page from the given URL and showing it on the screen. There could be many other scenarios.

I have created a webpage and put Async=”true” in the page directive in aspx file. This tells the page that this will be executed asynchronously. So let’s see the code behind

public partial class AsyncEAP : System.Web.UI.Page
    {
        protected void Page_Load(object sender, EventArgs e)
        {

            WebClient client = new WebClient();
            Uri uri = new Uri("http://www.google.com/");

            // Specify that the DownloadStringCallback method gets called
            // when the download completes.
            client.DownloadStringCompleted += new DownloadStringCompletedEventHandler(DownloadStringCallback);
            client.DownloadStringAsync(uri);
        }

        void DownloadStringCallback(object sender, DownloadStringCompletedEventArgs e)
        {
            if (e.Error == null)
            {
                renderedItem.InnerHtml = e.Result;
            }
        }
    }

So if we see the above code then we see that in Page_Load method after creating the instance of WebClient, I have subscribed the completed event and then called the DownloadStringAsync method. DownloadStringCallback method gets called once the download completes. Here I just checked if there is an error while executing and if there is no error then accessed the result. Here there is no way to find the status of the task but sure that once the method completes its processing, the completed event handler will be fired.

There are many other classes that provides the async feature using this model and we can use that. In my next post, We’ll use Task based asynchrony and see how can we leverage that in our ASP.NET pages.

Cheers,
Brij

Writing Asynchronous Web Pages with ASP.NET- Part 1

Asynchronous programming is not new but recently getting precedence over synchronous model. As user experience is now our top priority, we provide our considerable amount of effort to provide user a seamless experience. Asynchrony is one way to achieve it. I am going to write a series of posts on this topic.

Normally in our day to day programming,  web pages that we write, executes synchronously. But having lot of data on a single page mar the performance of web page. Even sometimes, we have lot sections in our page that can be loaded independently and parallely. Keeping it in mind, Microsoft introduces new way of writing asynchronous programming (Task based asynchronous pattern) with .NET 4.0 and further simplified it using async and await keyword in .NET 4.5. Currently, There are three pattern are available for writing asynchronous code

1.    Asynchronous Programming Model (APM)
2.    Event based Asynchronous Pattern (EAP)
3.    Task based asynchronous Pattern (TAP).

Asynchronous web pages can be written since ASP.NET 2.0 but it does not got much attention. Now it’s time to take advantage of this feature with available asynchronous models. In this post, We’ll use Asynchronous Programming Model (APM) to write the asynchronous web page. First let us just briefly discuss about asynchronous programming model (APM).

Asynchronous Programming Model (APM)

This asynchronous programming model is introduced with .NET 1.0 and it is also called IAsyncResult pattern. Here there are two methods are required, one starts with Begin keyword and another starts with End keyword so the name could be BeginOperationName and EndOperationName (This is just a naming convention). And once the BeginOperationName method is called, the thread is released and the task gets executed asynchronously, in the meantime and the released thread can pick some another task and EndOperationName method is called once the asynchronous task completes. BeginOperationName returns the type IAsyncResult. It can be pictorially shown as

APM ModelThere are few classes like FileStream (available under namespace System.IO.FileStream) exposes multiple type of Read methods like synchronous calls, it has Read() and for APM pattern it has BeginRead and EndRead as well. We can ourselves implement the same methods if we want to provide the similar feature to the class users.

Now let’s write our asynchronous web page using APM model. First, to make a page asynchronous, we need to set async=”true” in the page directive.

So in this web page, we are going to fetch the data from database and then bind it a GridView. So the code behind looks like

    public partial class AsynchronoususingAPM : System.Web.UI.Page
    {
        private SqlConnection sqlConnection;
        private SqlCommand command;
        private SqlDataReader sqlDataReader;
        protected void Page_Load(object sender, EventArgs e)
        {
            if (!IsPostBack)
            {
                AddOnPreRenderCompleteAsync(
                    new BeginEventHandler(BeginDataLoad),
                    new EndEventHandler(EndDataLoad)
                );
            }
        }

        IAsyncResult BeginDataLoad(object sender, EventArgs e, AsyncCallback asyncCallback, object state)
        {
            string connectionString = WebConfigurationManager.ConnectionStrings["AdventureWorksLT2008R2ConnectionString"].ConnectionString;
            sqlConnection = new SqlConnection(connectionString);
            sqlConnection.Open();
            command = new SqlCommand("SELECT Top 20 Title, FirstName, LastName, EmailAddress, Phone FROM SalesLT.Customer", sqlConnection);
            return command.BeginExecuteReader(asyncCallback, state);
        }

        void EndDataLoad(IAsyncResult asyncResult)
        {
            sqlDataReader = command.EndExecuteReader(asyncResult);
        }

        protected void Page_PreRenderComplete(object sender, EventArgs e)
        {
            gdCustomers.DataSource = sqlDataReader;
            gdCustomers.DataBind();
        }

        public override void Dispose()
        {
            if (sqlConnection != null)
                sqlConnection.Close();
            base.Dispose();
        }
   }

So here, if we see we have written to methods BeginDataLoad and EndDataLoad and binding that data Page_PreRenderComplete. So when we run this page, it looks likeAsyncPageLet’s discuss how it flows. When a user makes a request for this page, a thread is assigned to it from the thread pool. When the request reaches where it requires to fetch the data from the database, a database query is launched and current thread gets free and available to thread pool. When this query gets executed and the data comes to ASP.NET, ADO.NET requests a thread from thread pool and a thread is assigned to it from the thread pool which completes the request. It means while our database query was executing and the transporting the data from database to asp.net server, there was no thread involved and earlier executing thread was available to take another request.

Hope you guys have enjoyed this post. In the next post, We’ll write the asynchronous page using the next programming model.

Cheers,
Brij

ASP.NET 4.5 – Control display format of Data in Model Binding

I have written few posts on ASP.NET 4.5. One of the best feature I liked that is Model Binding that is almost similar to ASP.NET MVC. This is another feature of Mode binding in ASP.NET 4.5. For better understanding and usage, you should have some knowledge on this basic feature . You can refer my earlier posts on model binding at the links below

Strongly Typed Data Controls and Modal Binding in ASP.NET 4.5- Part 1

Strongly Typed Data Controls and Modal Binding in ASP.NET 4.5- Part 2

Now if your model is getting populated using entity framework or in any other way from the database then normally we apply some kind of formatting before displaying the data on the User Interface. Because the way data is stored in database and the way it is displayed on UI is quite different. We transform the data in a friendly, easy and some time in their Locale before displaying. Like say I have a number 100000 stored in database but we display it is 100,000 or displaying the number in specific format. So let’s take an example

I have created a class Employee as

public class Employee
{
    [Required()]
    public int Id { get; set; }
    [Required(), StringLength(30)]
    public string FirstName { get; set; }
    [Required(), StringLength(30)]
    public string Lastname { get; set; }
    [Required(), StringLength(30)]
    public DateTime DateJoined { get; set; }
    [Required(), Range(5, 1000)]
    public int Salary { get; set; }
}

Now let’s see the aspx page

    <div style="font-family:Verdana; font-size:small">
     <asp:DetailsView ID="detailsViewEmployee" runat="server" SelectMethod="GetEmployees"
       InsertMethod="InsertEmployee"  UpdateMethod="UpdateEmployee" AutoGenerateInsertButton="true"
       AutoGenerateEditButton="true" ItemType="Employee" ></asp:DetailsView>
     <asp:ValidationSummary ID="validationSummary" runat="server" ShowModelStateErrors="true"/>
    </div>

Here I am using details view and provided the ItemType as Employee, SelectMethod, InsertMethod and UpdateEmployee methods. The code behind of the file is as

    List<Employee> employees = new List<Employee>();
    protected void Page_Load(object sender, EventArgs e)
    {
        Employee emp = new Employee()
        {
            Id = 1001,
            FirstName = "Brij",
            Lastname = "Mishra",
            Salary = 100000,
            DateJoined = new DateTime(2012, 12, 12)
        };

        employees.Add(emp);
    }

    public IQueryable<Employee> GetEmployees()
    {
        return employees.AsQueryable();
    }
    public void InsertEmployee(Employee e)
    {
        if (ModelState.IsValid)
        {
            employees.Add(e);
        }
    }
    public void UpdateEmployee(Employee e)
    {
        // Update the employee
    }

Now let’s run the code

WithoutDIf you see the encircled area in above screenshot, one is date format and other is a number. One may want to display it in some friendly format. One way to transform the data before displaying and other is to use DisplayFormat Attribute. DisplayAttribute is applied on model so here I am going to apply it on DateJoined property of Employee class asDateJoinedhere we have added the DisplayFormat attribue and provided DataFormatString. This string is used to format the string before displaying it. Let’s add DisplayFormat attribute to salary property as

salaryHere also, We provided a different format string for number. Now let’s run it

formattedNow if you see that Date and number is properly formatted. We just required to add one attribute and provide the format string that is used to format the data.

DisplayFormat attribute provided some more very useful properties. Few of them

  • ApplyFormatInEditMode- Provide this property in attribute and set it true. It will format the data when the form will be in edit mode as well else you’ll loose the formatting in edit mode.
  • NullDisplayText- If any property is null and you want to show some default text then it is very useful. Just provide the string and it’ll be displayed if that property is null
  • ConvertEmptyStringToNull – If you want to convert empty string treated as null then set it true.

Hope you have enjoyed the post and you’ll use the power of DisplayFormat attribute in your ASP.NET 4.5 projects.

Thanks,
Brij

Html.EditorFor – Extend for custom type

In this Post, I am going to discuss about ASP.NET MVC and razor view engine. As we know that ASP.NET MVC provides many helper methods that helps in generating the UI based on the model. But there could be scenario where the available HTML helpers wont work and you require to create new custom one. There could be one scenario, where you have a class that has a enum property. Now if you create a Create/Edit view for that property then it will just create a TextBox for it. Obviously which is not a good idea. A User may enter some wrong string which cannot mapped to a enum value. So the better way to provide a dropdown to select any value. There could be many ways to render it. We’ll discuss one elegant way to do this.

First let’s understand that how does the available helpers work. Lets start with an example. Say we have a class like

    public class Speaker
    {
        public int Id { get; set; }

        public string Name { get; set; }

        public bool IsAvailable { get; set; }
    }

So here, in this class there are three properties: Id, Name and IsAvaiable. The first two are of type string and third one is of bool. So when we create a View for this model It looks like

</pre>
<div class="editor-field">@Html.EditorFor(model => model.Name)
 @Html.ValidationMessageFor(model => model.Name)</div>
<div class="editor-field">@Html.EditorFor(model => model.IsAvailable)
 @Html.ValidationMessageFor(model => model.IsAvailable)</div>
<pre>

I have not included the whole source code of the View but if we see the above code then find an EditorFor (called templated helper) is used to generate the UI. Let’s run and see the UI Initial We can see one Textbox and other Checkbox on the screen right. But how does it take place? Actually when it renders on the browser, it checks the type of the property, and based on the type, picks the appropriate template and renders it on screen. For type string(which is name here), it has a defined template as Textbox and for bool (which is here IsAvailable) also it has a template as Checkbox . So the same templated editor method renders different UI based on the type of the property. Let’s move ahead and add another enum property I have created a enum type as

 public enum ExpertiseArea
    {
        ASPNET,
        Csharp,
        WindowsAzure,
        WCF
    }

Now lets add one more property to the class of type enum defined as above

public ExpertiseArea Area { get; set; }

Now we need to add a new editor for Area as

</pre>
<div class="editor-field">@Html.EditorFor(model => model.Area)
 @Html.ValidationMessageFor(model => model.Area)</div>
<pre>

When it will be rendered on UI, it will simply add a Textbox for enum as

withoutddl

which is not a good Idea as discussed. To provide a Dropdownlist for the enum, we need to create a custom editor template.

To create a custom editor template, create a folder named EditorTemplates under Views->Shared folder. So that the editor templates gets available to all the Views.Now create a Partial View under that folder with name as your Enum (which is here ExpertiseArea so partial view file name will be ExpertiseArea.cshtml). Now in this View we need to create the drop down list. For dropdown list, we need to get all the item names from the Enum Type and create the items for drop down. So here my my partial view ExpertiseArea.cshtml contains

@using System.Web.Mvc;
@using Application1.Models;
@{
    var names = Enum.GetNames(typeof(ExpertiseArea));
    var values = Enum.GetValues(typeof(ExpertiseArea)).Cast();

    var items = names.Zip(values, (name, value) =>
        new SelectListItem { Text = name, Value = value.ToString() });
}

@Html.DropDownList("", items)

In above code, We are getting all the names and values from Enum and creating the items for dropdown and once we create the items, we used the dropdown list helper to populate the dropdown. So now lets render the create the page again.

dropdownNow a dropdown is rendered with all the possible enum type values for enum type property. And the same will be used at many places, wherever we want to get the user input on this enum value. And there will be no change in the Views.

So we have seen that how easily we can create custom editors for specifc types and can use it uni formally in the entire application.

Happy Learning,
Brij

How to use two different languages in a .NET Project

Did you ever try to use two languages in some of your project? Or Say you created a Class in VB.NET and used in C# code. As .NET provides us the capability to use multiple languages in same project, even it allows to inherit a VB.NET class in C# Class.If you have not tried earlier then this post will help you in getting practical examples. So Let’s move to the example

In this example, I have created two projects : one is C# Class library project and other is VB console application. My C# class looks like

    public class Person
    {
        public void Print()
        {
            Console.WriteLine("C# - Person's Print method");
        }
    }

It’s perfectly legal to inherit C# class in vb class. So here my vb class looks like

Public Class Student
    Inherits CLSCompliantCsharp.Person

    Public Sub Display()
        Console.WriteLine("I am Student VB class")
    End Sub
End Class

So here I have just added one more method Display in my vb.net class. Let’s move to main method

Module Module1
    Sub Main()
        Dim o As New Student()
        o.Display()
        o.Print()
        Console.ReadLine()
    End Sub
End Module

Let’s run it and see the output.

NormalSo it is perfectly fine and run as expected. Now let’s add one more method in my person class as

    public class Person
    {
        public void Print()
        {
            Console.WriteLine("C# - Person's Print method");
        }

        public void print()
        {
            Console.WriteLine("C# - Person's print method");
        }
    }

Now I have added one new method with same name print but it’s first letter is small letter. As we know that C# is case sensitive language so having the method with same name with different case, is perfectly legal.So lets build the C# project after making the changes So it is perfectly builds.

Now again move to the VB project and run the code.

Oh.. it throws a error as

errorAs we can see that it is giving error message that Print is ambiguous because for VB.NET Print() and print() are same while for Csharp different.

So How to deal this?

.NET provides us a way to make a library language neutral i e it defines some basic set of rules that can be applied to any library to make neutral. So if you think that your code/dll might be used by different language then you must apply an attribute to the your assembly.

The attribute is CLSCompliant

So if you want to make it a Class library CLSCompliant then add this attribute in the AssemblyInfo.cs file as

[assembly: CLSCompliant(true)]

I have added the above attribute in my C# project and now lets build it (with having two print method as earlier)

CLSComplaintWarningNow if you see that then it is showing an warning that this code is not CLS-Compliant Now you can correct it. Once you remove all the CLS-Complaint warnings and you can take a deep breath. You wont get any complaint if your code is used on any other language in .NET platform.

CLSCompliant attribute also provides more granular approach. It means if you don’t want to make the entire Class library as CLS-Compliant then you apply this attribute at class level as well. Then compiler will apply this attribute on that class only and that can be used by other language applications accordingly.

Hope you all have enjoyed this post.

Cheers,
Brij

Presented on ASP.NET MVC and Entity Framework on 18th Jan

Hello All,

It was a perfect day on 18th Jan 2014 at C# Sharp Cornet Delhi Chapter Event in Noida. The winter in Delhi was at peak and we all know (Dilli ki Sardi..) But we were enjoying the technologies with fun the entire day.  Around 70 attendees participated and learned the technology whole day. A big thanks to all the attendees, C# Corner, Co -speakers who made the day. A group click at the end of the event

IMG_2002

I took the last session of the day and discussed MVC and Entity Framework which was full of Demos. I discussed following Topics

  • Basics of ASP.NET MVC
  • Basics of Entity Framework
  • Entity Framework
    • Database First
    • Model First
    • Code First
  • Crud Operation with ASP.NET and EF
  • Custom Templates and Data Annotation
  • Authentication
  • Authentication using External Identity Provider
Please find below the presentation and Demo.
For official recap of the event click here
Again thanks a lot to you all.
Cheers,
Brij

Join ‘Hands on Lab’ on ASP.NET MVC and Entity Framework with me

Hello All,

C# Corner Delhi Chapter is going to organize first event of the new year on 18th January 2014. It will be a full day event and a list of hot technologies will be discussed throughout the day.  The whole day will include two hand on labs one on ASP.NET MVC5 and other on WCF Services. Agenda of the day will be

  • Expose CRUD Operation as WCF Services (HOL) by Dhananjay Kumar
  • Get hand on Threading in C-Sharp by Suchit Khanna
  • Learn to do Unit Testing of your code using NUnit by Amit Chaudhary
  • CRUD Operation on ASP.NET MVC (HOL) by Brij Mishra

The details of the event are

Date and Timing – 18th Jan 2014, 10:30 PM to 5:00 PM

Is there any fee – No. It is Absolutely free

Venue –

MCN Solutions Pvt. Ltd.
H-217, Second Floor,
Sector-63, Noida
Landmark: Behind Indian-Oil Petrol Pump
Contact No: +91-9810371053

I’ll cover the following topics in my Hands on lab

  •     Introduction to ASP.NET MVC and ASP.NET MVC5
  •     Create MVC App performing CRUD
  •     Create model using Entity Framework
  •     Authentication using external Identity Providers

For more details and registration Click here

Come with your friend and learn with us. See you all at the event.
Cheers,
Brij

How to download a file forcefully instead of rendering on Browser

Being a web developer, you must have worked one or more times on providing feature for downloading a file. If not, you’ll work in near future. Anyways let’s discuss a scenario.

Normally, we see that when we click on a link of the file to download that link opens up in the browser. Actually when we click on the link, request is sent to web server, and server returns the content to the client. Based on the file name extension, browser decides the type of content and accordingly, if browser has a capability to load the file on browser that it shows it in the browser. If browser is not able to display on the browser the shows the download file dialog box to save it. You may see different behavior in different browser because some browser may able to show it on browser and other may show the download dialog box. But you can save it via browser save as option if it is rendered on browser.

But How to forcefully show the save as dialog to the user?

As we already discussed that when we click the on any link then based on the browser capability the browser shows the dialog box or open it in the browser itself. But to show the save as dialog every time (for every type of file) we need to to tell browser that this is an attachment. For this we need to add a Content-Disposition Header in the response. This should be as

Response.AddHeader(“content-disposition”, “attachment;filename=somefile.ext”)

You can write the code to download the file many ways. But if you want to download it using the browser’s download dialog box then we need to add Content-Disposition Header. We can write the code for downloading a file as
filedownloadOnce you add the Content-Disposition header, the file will always be downloaded. As the behavior of browsers varies as Firefox shows a save as dialog, Internet Explorer (v11) prompts at the bottom side of browser, while Google chrome downloads it without prompting but in any case file will be downloaded.

Thanks for reading the post.

Cheers,
Brij

How to consume WCF REST services using C#

In this Post, we’ll see how can we easily write a code for consuming WCF Rest services. There could be many other scenarios where we need to write a test Client application to test WCF Rest services. In this post, we will consume two type of HTTP methods GET and POST. Let’s see one by one

Consume Get Method
Here, We can have a WCF Rest service which is deployed somewhere on web server or at IIS on local machine or even uses Visual Studio integrated web server. In my sample, I am using Visual Studio one. And the URL of that service is

http://localhost:26944/Service1.svc/User/GetAllUsers

By Default Get method’s input and output parameters are of type XML(default) or JSON and returned in string format. Here the method returns in JSON format. Let’s write the sample

So what all steps we need to perform

1- Create a HTTPWebRequest object with the provided REST service URL

2- Initiate the request and get response

3- Read the stream from the response

4- Serialize the stream and read the result

Let’s jump to the code

GetCodeSo as each line of code is also commented as mentioned in the step. Let’s run it as well

So it is fairly easy to pass a parameter in Get method. It is passed via URL only so it can of type string only.

Also, the REST Services exposed via GET method, can be called and Tested via browser. So to test it via browser, you should browse the complete URL (service url including method name or as URI defined while exposing). Here the method takes no parameter and returns a list of object of custom type.

Now Let’s move to Post method

Consume Post Method

It is not as straight forward as above one. As we know that in the Post method the input is passed in body of request and that should be properly serialized as well. As we know that WCF uses it’s own serialization named as System.Runtime.Serialization so it should be used for serializing the input. If you are using XmlSerializer or other then you might face issue.

Here in my service method, it is taking a custom object type parameter and returning same type as well. The REST method signature looks like

[WebInvoke(Method = "POST", UriTemplate = "/User/GetAllUsersInfo")]
UserInformation GetUserDetails(UserInformation user);

And the service URL would be like

http://localhost:26944/Service1.svc//User/GetAllUsersInfo

Here we need to have some more steps while calling this service. the steps are like

1- Create a HTTPWebRequest object with the provided REST service URL.

2- Provide the method type and Content Type to the request.

3- Create the input object and serialize it and then assign that stream the request.

4- Initiate the request and get response.

5- Read the stream from the stream and deserialize the stream into the object

Let’s see the code

PostThe code is self explanatory and commented as well .Here some of the key things to keep in mind that How the input object is serialized and assigned to the body of the request and similarly reading the response from the response. The code is

Hope you all have enjoyed the post. Thank you all.

Cheers,
Brij