Millions of software has been built in last couple of decades which helped in coming up a set of patterns for resolving different problems and we have a ready reference as GoF design patterns from quite long now. In last decade, Inversion of Control and one of its implementation Dependency Injection (DI) became one of most used pattern across platforms for building great soft wares. Agile methodology for building software which focuses on small releases and more adaptive to the changes, made it very important tool. In this post, we will discuss Dependency Injection and different.
What is Dependency Injection?
Dependency Injection is a design pattern which is an implementation of Inversion of Control (IoC) that provides us a way to resolve dependencies. Objects works in collaboration model and the whole communication becomes pretty complex as system grows. Inversion of Control says that the objects should not itself create the object/component on which they are dependent to their work, instead these are passed from external sources.
ASP.NET Core and DI
Due to DI’s long list of advantages it has become the norm in software development. But implementation in earlier versions of ASP.NET was not straight forward. Although there are different extensions and libraries made our life easy but ASP.Net as a framework was not open for the same. Due to these kind of new challenges, Microsoft has overhauled the complete framework and made the changes from ground up. The new framework is modularized and using the DI at its core. ASP.Net Core itself provides basic IoC container that we will discuss and later we will how we can use other.
Default container in ASP.NET Core
As mentioned earlier that ASP.NET Core uses DI for instantiating all its components and services. This container is configured in startup.cs class which is the entry point to an ASP.NET Core application. In Startup.cs we have method ConfigureServices which is where we configure all the services that can be later used in the entire application’s life cycle. Let’s see what all are the options provided by ASP.NET core.

ASP.NET Core provides above three options to register the services. Let’s discuss each.
AddTransient
Services registered using this method get instantiated each time it is accessed. If we have a service which is used multiple places in same request, a new instance would be created each time.
This method should be used for lightweight, stateless and rarely used services. Let see an example.
Here I have created a service named as TestService which has a method named as GetUniqueId. In this method, I am returning the hash code of the for the instance to check the uniqueness of the instance as
    public class TestService : ITestService
    {
        public int GetUniqueId()
        {
            return this.GetHashCode();
        }
    }
This service is injected at two places in the sample MVC application
- In my home controller as
public class HomeController : Controller { private ITestService testService; public HomeController(ITestService _testService) { this.testService = _testService; } public IActionResult Index() { ViewBag.ServiceInstanceId = testService.GetUniqueId(); return View(); } } - And in my view (Yes we can inject services in the View as well) as

Here service is injected in it at line 1 and called the GetUniqueId method at line 6. While at Line 4, unique Id for the instance is displayed that got injected in home controller. Now it’s time to test the application and register the service as
public void ConfigureServices(IServiceCollection services)
        {
            services.AddMvc();
            services.AddTransient<ITestService, TestService>();
        }
When we run the application

Here we can see that in the same request we are getting two instances as expected.
AddScoped
In case of AddScoped, only one instance is created for each request, regardless the number of times it is used in the request. So if you have a service which maintains some state in each request or used frequently then it could be a better choice.
In the same example, we will change the registration of service as
services.AddScoped<ITestService, TestService>();
And run the application

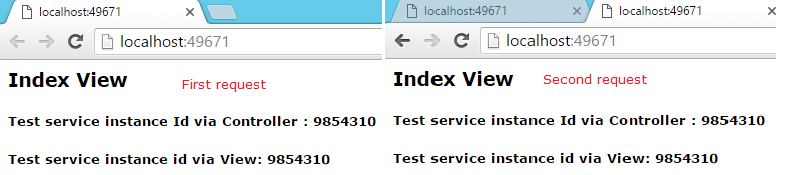
Here we see that only one instance created for the same request. Let’s see multiple requests

As expected here, two different instances gets created for different request while it is unique per request.
AddSingleton
As the name suggests, it created only once instance which get created in the first request itself. In every subsequent request, same instance is used. So, if there is requirement of a singleton behavior, maintaining state across requests then this option is best. Creating our own singleton behavior is not recommended.
It provides two important flavors.
- First where we let the framework to create the instance as
services.AddSingleton<ITestService, TestService>();
- Second where we create the instance and register the same instance as
ITestService testService = new TestService();
services.AddSingleton(testService);
So if we have some custom heavy object that can be used across request or do some changes in the instance before registering then second option is good.
Now let’s run the application
Here we get the same instance across multiple requests.
Third party DI containers
For basic usages of DI, we can use the default DI container but for the advance usage, we can use any third part DI container with the ASP.NET like Autofac, Unity, Ninject etc or some custom one. For that we need to have an adapter which provides implementation of IServiceProvider or we can write our own. We have already the required implementation for Autofac which can be easily integrated. let’s see that.
Using Autofac with ASP.NET
It’s very simple to leverage to use the power of Autofac. We need to include the following package in our project.
Autofac.Extensions.DependencyInjection
Once that is added, we need to make few changes in ConfigureServices Method. By default, it returns void but to use other provider, it should return IServiceProvider. We will create the instance of ContainerBuilder then register our services. Then get the container and return the service provider from the context.
        public IServiceProvider ConfigureServices(IServiceCollection services)
        {
            services.AddMvc();

            var builder = new ContainerBuilder();
            builder.RegisterType<TestService>().As<ITestService>().InstancePerLifetimeScope();
            builder.Populate(services);
            var container = builder.Build();
            return container.Resolve<IServiceProvider>();
        }
Here we can see that we provided the life time of the instance while registering the service similar to AddScoped. We can also see that we used default container to add mvc, it means we can mix and match with containers.
Final words
Dependency Injection is very helpful for writing loosely coupled and testable software. Its usage with earlier versions of ASP.NET was bit tricky but with the new version ASP.NET, It has become the first-class citizen of ASP.NET Stack. We have seen that it provides a basic DI container and discussed with an example with details. Also, we discussed that how we can configure other third party containers like Ninject, Autofac, unity etc. We have configured Autofac in our example and saw we can use multiple container in same application.

Pingback: Exploring ASP.NET Core View Component | Code Wala
Nicely explained.
Thanks
This is very good, thanks.