Advance CSS Selectors – Part 2

This post is in continuation of my previous post on CSS Selectors where I discussed about three primary selectors : Element, Class and Id. Later we discussed that how can we group multiple selectors to same CSS style. We also discussed how browser applies these CSS rules. There are many more powerful css selectors that we can write for targeted elements. Refer the below link to look on my previous post.

CSS selectors for beginners

Before moving ahead, lets just quickly discuss that how browser processes the HTML that it recieves from network layer. Browser has its own rendering engine which parse the HTML and constructs a DOM (Document Object Model) tree where each HTML tag added as a node in the Tree. It looks like

pic_htmltree (source: http://www.w3schools.com)

Now let’s move to the next selectors and where we will see these selectors follows the DOM structure.

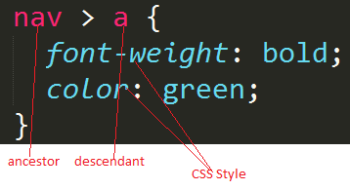
Descendant Selectors : These type of selectors contains more than one selector. It matches all the elements that are descendants of the provided element. You can also understand this is parent child relationship where it can go up to any hierarchy and the last child of the element is searched in all the elements under its parent element (ancestor). Lets see how do we write that

desc

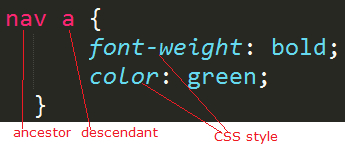
The above rule matches all the <a> (anchor) elements under nav tag regardless at what level it is. In the example, I have five child elements in my nav tag, in which four are <a> element and fifth is div element which contains another <a> element. This selector finds all the anchor tags under nav tag. There are some more anchor tags outside nav tag which are not selected. Lets see the example.

https://plnkr.co/edit/ZMnJH4KD71BmfmRxor9f?p=preview

if we change the selector as

desc-1

Then it applies the element which follows the above hierarchy and all the anchor elements inside the div which is inside nav. In the previous example, now it will applies to only one anchor (About me).

Child Selector

This selector similar to previous one but bit more constrained. It only finds the direct descendants of the provided element, i e looks only siblings elements. It is defined as

child selectorHere it only finds the <a> elements which is directly under the nav tag. I am using previous example and changing only the selector. Now this applies to only four out of five anchor tags because these four are sibling and another one is inside another div tag. Lets see the example.

https://plnkr.co/edit/4V5gFILER8E5RZP6ZNYd?p=preview

Similar to earlier, we can add more hierarchy to narrow down for focused search.

Adjacent Siblings Selector

It is another selector but less used. As the name suggests, it applies to siblings or element at same level. It is combined by a symbol plus (+). One more thing, the siblings should be adjacent sibling as the name suggests and in the same order.

adjacent selector

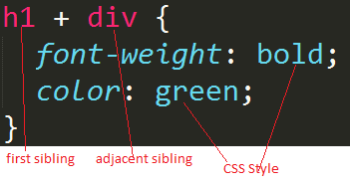
The above selector matches all the div elements which are just after the h1 elements in the same order. In my example, I have a div element and after h1 tag. Lets see the example

https://plnkr.co/edit/i9DRyvobL9mGENtFvUnl?p=preview

We can see that in all the three selectors how DOM tree structure helps in finding the elements easily.

Let’s move another set of selectors. As we know that in the era of rich web pages, single page applications etc most of the times pages gets very heavy and contains lots of html elements. So it is our duty to write the right selector which is narrow down the search scope.

Narrowing the selectors

Dot (.) can be used for narrowing down the selectors. Let’s see an example

dot

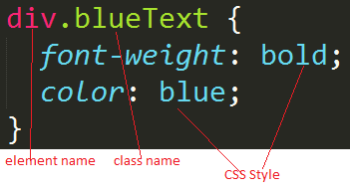
Here it is going to find all the div elements which has class as blueText. Here both the rule applies to same element. In the example, I have a div with blueText class where this rule applies while there is other div which is unaffected

https://plnkr.co/edit/XwTYuHznwoFsLDvriVEk?p=preview

Attribute Selectors

It is another type of selector which finds the elements that has a specific attribute and apply the provided style on that. Lets see how to use that?

attribute

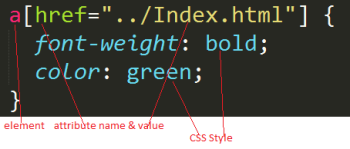
Here it finds all the <a> which has a href set as  ../Index.html. In the example, I have two <a> elements with the same href value. Lets see this

https://plnkr.co/edit/P27HO2sfVHWeX4hwJn2N?p=preview

We can add more power to attribute selectors by using operators. Few are

operator

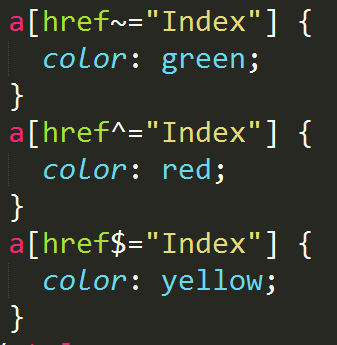
First rule finds the elements which contains Index in href. Second one selects the elements which href starts with Index and third one finds the element which href ends with the given value. This rule can be used with any attribute of an element like alt, class etc. You can explore more operators.

In this post, I have discussed lots of different selectors which can be used. Even on top it, we can have n number of combinations of these all based on our requirement. Hope you will be writing better CSS rules using these selectors.

Cheers
Brij

Advertisement

CSS selectors for beginners

Being a .NET developer I worked most of time on server side code and could not pay required attention on the UI as there was always somebody there for that. But in recent times, we have seen awesome things happening in this front with the new technologies like HTML 5, CSS3, bootstrap etc forced me to start learning that. I have started from learning CSS and sharing today CSS selectors with examples. So let’s start from basics.

What is CSS?

CSS i. e. Cascading Style Sheet is a styling language for HTML documents. It tells an HTML document (which contains set of HTML elements) that how does the elements of HTML will be displayed mostly on browsers but also used for Paper and other media.

How to apply CSS on an element.

The simplest way to apply CSS to an HTML element is via style attribute of the element but that is not recommended approach. Recommended approach is via style sheet where we put the list of css rules. But on which html element or set of elements these css will be applied, is determined via CSS selectors. Browser has a its own selector API which traverses the DOM (document object model) and pick the elements which matches to the selectors. In this post, I have created examples at Plunker for examples so that we can see it running.

Why CSS selectors are important?

CSS selectors are very important not just because of finding an element where css applies but also these are used JavaScript libraries like AngularJS, jQuery to pick the elements from DOM to attach the behavior or data to these elements. These libraries are heavily used now a days. So using the correct selector helps in performance and writing in better code.

There are three type of selectors.

  1. Element
  2. Class
  3. Id

Element Selector

Element selector applies to all the instances of that element in the HTML document. Element selector looks like

ElementSelector

Here p ( i eParagraph) is element name and where I defined the color as blue. So in the document, wherever a paragraph element occur it will make the font color blue, other elements would be unaffacted. In the example, there are two p element in the page and both are blue now. See it plunker

https://plnkr.co/edit/Wa4mn5zRATyeGIqJZSsY?p=preview

Class Selector

Every HTML element provides an attribute where we can provide the css class name. To define CSS class name, it should start with . (dot) and there is no space between dot and class name. Lets see an example

class selector

Here blueText is the css class name and the style I left as is. Now unlike the element selector where css gets applied to the corresponding elements as soon as we include it in the document, here we need to make some changes in HTML elements. We need to add the provide it the class name attribute. Here we have the advantage that we can apply to different type of elements as

classex

In the example, I have created the css class as able and added the attribute to one paragraph(p) and one div element.

https://plnkr.co/edit/cSex0diaFAsXSqpKmzxQ?p=preview

Id Selector

Id selector can be applied to only one element in the html document as HTML specification suggests to have unique id for each element. There is an attribute with name Id is available to each element where we can define it. To define the css, it should start with hash (#) sign as

Id Selector

Here also there should no space between # and name of the Id. Any element with the Id name as firstPara found by browser, this css will be applied. Here also we do not need to make any specific changes to apply the css as while defining the css style, we can simply provide css for the specific Id. As this style can be applied max one element in the document so it is less used.

In this example, I have a paragraph with Id as firstPara and for this provided CSS as above.

https://plnkr.co/edit/mUV6YyW5WkraWM6iDsIL?p=preview

So we have discussed primary selectors. CSS allows many more options for writing efficient rules like Group selecters. Let’s discuss

Group Selectors

Grouping selectors means more than one selectors for the same style like

group

Above rule tells that this rule will be applied to those elements which either have class as blueText or with Id as firstPara,. Here we put , (comma) as separator for selectors. There is no limit on the number same or different selector. In the example. I have used firstPara to first p element and blueText to next div element. Lets see that

https://plnkr.co/edit/mUV6YyW5WkraWM6iDsIL?p=preview

Conclusion

In this post, we have discussed the primary CSS selectors : element, class and id and saw the running examples. We have also seen the that how can we group them in to one and use different selector in code. There are more powerful feature to these selectors, we will cover in next post.

Cheers,
Brij


Sass : A simplified way to write CSS – Part 3

This is the third post in series on SASS. In my first post, I briefly discussed about SASS and Variables. In my second post I discussed about operators and some important inbuilt functions. Links of earlier posts are

Sass : A simplified way to write CSS – Part 1

Sass : A simplified way to write CSS – Part 2

In my today’s post, We’ll discuss nesting, mixins and inheritance with SASS.

Nesting is very common practice in programming languages and supported in all the major languages in one or other way. Even if we see the normal HTML page then we find that the whole page is structured in a nested manner. Similarly we find it in XAML or even normal aspx page as well. But it is not supported in CSS.

Sass supports nesting. Let’s see via an example

NestedIf we see above code then we see the whole section is defined for navigation bar in a nested manner. Now let’s see the above CSS when it renders on client and looks like

nestedrenderedThe rendered version is above. Here the Sass pre-processor processes the file and converts it that can be understood by the browser. Here all the classes are rendered in separate blocks as required.

Now let’s move to other topic that is Mix-ins. In our CSS files, many times we write the same css style at several places. If we require to change the same then we need to update the same at several places. Let’s see it via an example

mixin-codeIn above code, we have defined a mix-in variable named custom-style and the same variable, we have used in another classes (class1, class2, class3). To use mix-in variable at another places,  use @include keyword as above in the code. Mix-ins can be used in another scenarios as well.

SASS also supports Inheritance. @extend keyword allows us to use the properties of another class. Let’s see it via an example

In this example, say we want to show messages based on response and change the background color based on response type like on error, warning, success etc. This could be written as

ineritanceHere if we see the above code then we find that we have created a class .message and later we used this class in other classes success, error and warning with extend keyword. Just let’s see how it gets rendered.

renderedinheritanceAs it clearly shows that the classes success, error and warning has power of .message class as well. So we can easily use the inheritance feature as well.

So we have seen in last three articles that Sass provides us the capability to use our normal programming techniques that we are using since long, can be used with CSS. This helps us in writing better and organized manner and also helps not to devote much time on normal CSS.

Hope you all have enjoyed this post.

Cheers,
Brij

Sass : A simplified way to write CSS – Part 2

In my last post, I have discussed briefly about Sass (Syntactically awesome style sheets) and Sass variables with examples. You can find the last post link below.

Sass : A simplified way to write CSS

Now in today post, we’ll discuss about operators and inbuilt functions provided by Sass.

Sass supports math operators like +, -, *, /, and %. There could be various scenarios using operators like say we have created some basic variables say a variable with font size as 9px. Now in our application we may require various font size based on locations like top, middle, different headers and other sizes for different sections which can be derived from the base font size. Similarly that can be done while using colors and other various case.

Let’s see it via an example. So my scss file is as

operator-1

If we see above, I have created a variable $base-font-size as 9px then used the same variable to derive font size for multiple classes h1, h2, h3. In h1, * (multiplication) operator is used, in h+ (addition) operator is used and in h3 % opertaor is used. Here if we see the variable in not a pure numeric variable, it contains px as well. But it is taken care while processing the scss file so we dont need to care about it and we can use any other —- as well. So let’s run the code and see the generated css file

operator-2

Lets see another example

$basepadding : 1%;
.thinpadding
{
    padding : $basepadding;
}
.thickpadding
{
    padding : $basepadding*5;
}
.superthickpadding
{
    padding : $basepadding*10;
}
.normalpadding
{
    padding : $basepadding*2;
}

Here I have defined a base padding and then use the same variable to define the different padding  classes that can be used to define padding at various places.

We can use these operators at various places based on the requirement.

SASS also provide a list of inbuilt functions that can be used for writing the scss which include color functions like darken, lighten, hue. Let’s see an example

We can have a base color and just we can use the same color or lighter color or darker color or any other color in our application. So it can be used as

$basebackgroundcolor : #EDF0F5;

.darkbackground
{
    background : darken($basebackgroundcolor, 50%)
}
.lightbackground
{
    background : lighten($basebackgroundcolor, 25%)
}

Here in first class we have used the darken color which produces the dark color by 50% while the second one produces the light color by 25%.
There are many other color functions and host other Number functions, List functions, String functions etc are available. For complete list, please refer the documentation here http://sass-lang.com/documentation/Sass/Script/Functions.html

In next post, I’ll discuss about Nesting and Mixins with examples.

Cheers,
Brij

Sass : A simplified way to write CSS

This is the age of revolutions. For me at least as a web developer, I am seeing it last few years. Once AJAX came into the market and become popular, it changed the whole web development and web experience as a user. Microsoft came up with the whole new AJAX control toolkit to make the UI very UI intuitive. The Client side technologies like JavaScript, CSS etc are always pain for a web developer like me. But jQuery gave a new flavor to Client side scripting and now get used in almost all web projects. There are many new plugins of jQuery came into existence and few of them got widely used.

And now it’s turn to CSS, I faced tough time working with CSS but new things are coming up. Microsoft always embraces these technologies so that the developer gets the benefit of these technologies and get the first class experience in their Visual studio itself. Today we’ll talk about SASS ( Syntactically awesome stylesheets).

So What is Sass?

As the full form of Sass it self says (Syntactically awesome style sheets). As per the sass website it is “Sass is the most mature, stable, and powerful professional grade CSS extension language in the world“. One does not need to learn any new technology instead uses the existing technology/learning and use that to write wonderful CSS in a very simple way.

So how does it actually works?

A Sass file is compiled into an normal CSS file while execution. When we run the application, the sass file get converted to css file and returned to the browser.

Next how to use Sass?

As now Microsoft introduces a new and very powerful tool Nuget to install packages/plugins for the project. It’s very simple and easy to install. In this example, I’ll be using ASP.NET, So I have installed the package SassAndCoffee.AspNet via nuget as

Go to -> Package Manager Console and type

Install-Package SassAndCoffee.AspNet

else you can also install via Manage Nuget Package.

It adds few dlls and some config entries in web.config. After installing it, It adds in HTTPModule which looks for any incoming request for all css request and tries to find the css file and if css file does not available then it looks for scss file and if it is available the process the scss file and convert it into css file and return it. So your page does not need to know about all the behind the seen processes, you just need to include the normal css file in your project.

.Sass provides us the capability to use programming language feature for writing StyleSheet. SASS provides us two syntaxes. The new syntax is known as SCSS (Sassy CSS) that is easy to write and also a superset of CSS3. I’ll be using it our posts. The file extension for it is scss. While the other older one is normal sass  and known as indented css and now is obselete.

Let’s see the basic feature of Sass. Sass provides us the capability

  • Declaring Variables
  • Allows Operations
  • Allows Nesting
  • Mixins
  • Extend/Inheritance

Doesn’t it look interesting? You get the basic features of any programming language for your css and you dont need to learn anything for this to use except some basics about how to use it.

So in this post, we’ll see the Variable and operations.

Variables – It means we can created the variables and use it in our file wherever require similar like in C# or other language. So variables can be created as

$common-font: verdana;
$common-font-size : 9px;
$basecolor : #000;
$custom-border : solid 5px, #000;

Variable could contain single value or contain list of items as $custom-border contains multiple values. So in my application, I have created a file with extension as scss ( Custom.scss) and that contains

first

Now if we run the application and access the file with URL

http://localhost:64983/style/custom.css

then it returns the processed css file as

secondAll the processing like here replacing with actual values, is done at server side. So it does not affect any client side catching.

If we have here option to create variable, then it should also provide the capability to do some operation over it. Yes, we can do it. We’ll discuss this in next part.

Also if we try to access the URL

http://localhost:64983/style/custom.scss

then it returns the error

HTTP Error 404.3 – Not Found

Hope you have enjoyed this post. In next post, I’ll discuss about various operations and few other examples.

Cheers,
Brij