IIS7 and Higher : system.webServer element ApplicationHost.config vs Web.config

Hi All,

This is another post on Authentication for ASP.NET applications. In one of my last posts, I talked about setting up authentication mode as Windows in web.config and Enabling/Disabling windows authentication at IIS. You can access that post from the below link.

Looking into Windows authentication at Web.config and at IIS
Continue reading

Advertisement

Authentication and Session timeout – Session expired message on clicking the login button

In my starting phase of Career, My client reported me a peculiar issue. They said that they get redirected to session expired page even before they actually Login.

In that application, We developed a generic methodology, then whenever a user clicks on any action that requires a post back, it first checks whether session is expired or not and if expired then redirects to a custom session expired page. Later, user can click on login link and redirected to Login page.

[As asked by one of my blog readers, There could be many ways for the generic methodology. I have seen people place common code at several place like Master Page,  some put in base class that further worked as base class for all the web pages. I used it in a base class. In my view there are other places like Global.asax and methods could be Application_PreRequestHandlerExecute, Application_AcquireRequestState .]

I analyzed that Issue and found that users used to open the website first page which is obviously the Login page and some of them left the page for a while around 15 or more minutes and after that they when they again back to system, used to enter the credentials and click on login button, it redirects them to session expired page.

It left them annoying and even me too. I have myself seen to many application where I open the Login page and after sometime when I enter my Login details but it redirects me to session expired page.

Some of my colleagues was saying, how a session can expire even before successfully login. I have also found many other developers have same question. So I thought of writing a blog post on it.

So first let me explain, how session works

Session_Life_Cycle

So as you can see above, as soon as user accesses the site and the first page gets opened, the countdown of the session timeout starts. So it does not matter whether you Login or not, session will be expired after the specified amount of time. So if your website does not have a check on session expiration before Login then it wont be visible to your user and even if user Logins after the specified amount of time, A new session will be created.

But so many people get confused about authentication and session. Session start and expire does not have any connection with authentication start and authentication timeout. Authentication works separately.

As you know, A user request any Page, It goes through many HTTPModules and lastly served by a HTTPHandler. We can show it pictorially as

ASP.NET Request Proessing

As you can see, An asp.net request goes through many HTTPModules and finally served by a HTTPHandler. Many features of ASP.NET are developed as HTTP Module. Session and Authentication are also developed as HTTPModules . For session handling we have SessionStateModule which is available under the namespace System.Web.SessionState and various Authentication mechanism in ASP.NET like Form Authentication is also available via a HTTPModule FormsAuthenticationModule which is under the namespace System.Web.Security.  So these two are separate modules and works independently.

Normally in our application, as soon as user clicks on sign out, we used to kill session. Normally, we set authentication time out and session timeout same but what may happen if we have

<forms timeout="15" loginUrl="Login.aspx" name=".ASPXFORMSAUTH">

and

<sessionState timeout="10">

What could happen

user's browsing history

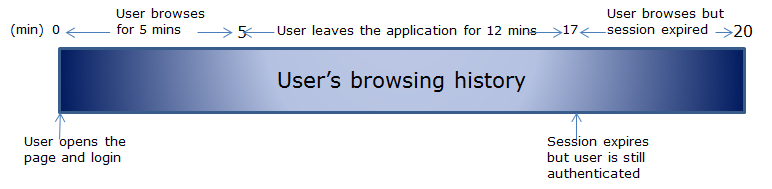
As you can see in the above scenario, I have set session time out is less than authentication timeout. After browsing for 5 mins, I left it for around 12 mins and my session got timeout.  As my session time out is 10 mins while my authentication time out is 15 mins. But I’ll be still authenticated and able to browse application even my session expired and got recreated and my existing session data will be lost.

So normally we put the authentication time out and same time out as same. This is just first step to avoid the discrepancy between the timeout of Authentication and Session.

But at certain browsers, it behaves differently. Like Session gets time out if the last request made was 10 (in my example session timeout is 10 minutes) or more minutes and on every request the counter get resets for 10 minutes but Authentication timeout does not work in same ways in different browsers. Like if have authentication timeout for 10 minutes, the authentication timeout counter does not get reset on every request to 10 minutes. Sometimes there are some performance improvement has been done which resets on the counter only at certain points say if after 5 or 7 minutes as to reset the authentication timeout on very request is costly. And this may lead to discrepancy.

Other scenario, If some how IIS gets reset the sessions of the users connected to that web server will become invalid while the user authentication will still be valid.

To avoid any unprecedented event like above, I put a check for an authentication and session on every page, So that user cannot continue further if session or authentication is not valid. Also if we found user is not authenticated any more then used to clear and abandon the session and redirects the user to login page. Similarly, if session is not available then the remove the user the authentication as well.

Also, at the time of user clicking on Logoff, one should clear and abandon the session. So that same session is not available after Logoff.

So as you can see, that session and authentication works separately and they work parallely and independently.

So for the problem stated earlier in this post, I suggested a solution to avoid the issue but you can yourself can put your own logic to prevent the issue.

Hope you all have enjoyed this post. Please share your valuable feedback.

Cheers,
Brij

ASP.NET 4.5 : Login using other Authentication Providers Simplified

In this Post, I am going to discuss one of the other new features of ASP.NET 4.5. That you’ll like. I’ll also try to make it simple and include step by step tutorial so that you can implement at your environment.

Now a days, you guys must have seen that almost all leading websites allow you to login with your other accounts/credentials. It may be Facebook, Gmail, Twitter, Microsoft and many other.

I like this feature very much because a user don’t need to register on every website where s/he wants to login and reduce the login credentials count drastically and make life simpler.

So Facebook, Gmail, Twitter… works as Identity provider that provides there APIs that one can integrate with there application and allow user to login with their Facebook, Twitter, Gmail… accounts. There are various ways to implement it and they work on some standard protocols so that everybody can understand their API.

Currently, most leading identity provider follow OAuth standards and OAuth provides a process for end-users to authorize third-party access.

So now let’s come to ASP.NET. ASP.NET 4.5 new template has the required code already in place that you require to write to uses the third party Identity provider. You just need to enter some required Ids and secret keys and once you provide it. It’ll start working.

So let’s first create a ASP.NET application as FILE|NEW|Web Site|ASP.NET Web Forms Site. Now if you open the solution explorer, It has created lots of files and that provides many feature already implemented, you must have seen in earlier version as well. I assume you have basic Idea about all that.

Now let’s open a file under App_Code/AuthConfig.cs. Now if you check this file has several lines of commented code. If you see that closely, then actually it adding authentication clients like Twitter, Facebook, Microsoft, Google . Now here, you need Id and secret keys for the authentication clients that you need to provide.

So I have uncommented the code for two authenticated clients Twitter and Google. And I have put my Twitter  key and secret key while Google doesn’t require any. Now as soon as,  you run the application and click on login link at right top, you ‘ll see below

Login

You can see two buttons Twitter and Google. A user can use these accounts to login. Let’s click on twitter.

Twitter Login

It took me on the above page and I entered here my Twitter account and clicked on sign in and it took me at the following page

AfterLogin

here I can change my my user name and I changed it as Brij. As soon as I click on login, I am authenticated and you can see that I am now loggedin.

LoggedinWithTwitter

Now if you click on the user name (Brij) shown in above pic right corner, It shows the following page.

twitter-ResetPwd

It allows you to set a local password. After setting your local password you won’t need to your login via Twitter  to authenticate the current website. Now if you see the last section, it shows twitter account which is used for login.

You can login with other account as well at same point of time. As, I have enabled the two authentication providers Twitter and Google, you are seeing both of these two at last section . And when I click on Google it takes me at Google login page. As soon as I put my credential and click on Sign in button. It shows me that I am logged in as using two accounts. Twitter and Google as

Loggedinwithtwoaccount
Also, you can see after login with two accounts, it shows a remove button to remove any authentication. And as soon as you’ll click on any remove button that authentication will get removed and other remove button will also be removed. Because for login, at least one authentication is required.

Now I’ll tell you, How I created Ids and secret for my local App. To create appId and secret from Twitter go to link TwitterApp .

Once you click on the following the below steps:

  1. Click on Create a New Application
  2. Put the name and description of your application.
  3. Now, put the URL of the your local application. A caveat,  you cannot put the URL generated by Visual Studio integrated server. So host your application at local IIS but twitter wont accept localhost URL as well. You need to have some URL that be hosted on some domain. So how can you mimic that scenario on your local server. I have found a interesting testing domain localtest.me . This is not localhost.me but localtest.me.
    So to set the domain, Go to IIS->Default Web Site. Right Click Default Web Site and Click on Edit Bindings. Here I added a Site Binding (localtest.me)  by Clicking on Add button. I just entered the Host Name localtest.me as

AddBinding

So my application URL for twitter was http://localtest.me/testdomain/Default.aspx.

So once you’ll put all these and save. You’ll get Key and Secret that you can use for your ASP.NET 4.5 local application.

So you have seen, How ASP.NET 4.5 simplified our life by providing inbuild mechanism for using other leading authentication providers. We as developer don’t need to worry about underlying complex logic. Just need to provide some AppIds and Secrets and Google does not require any Id and secret as well.

Hope you all have enjoyed.

Happy Learning,
Brij

Single Sign On between sub domains : Forms Authentication

Today, I am going to discuss one of the feature, that I was working last few days and spent sleepless nights at office and Home as well. Here I am going to discuss Single Sign On (SSO) feature and every other developer implements SSO on some or other day.

So Actually I was having two applications. The requirement was like, user logins from one application and on clicking a link it is navigated to another application. So when user clicks on the link it redirected to application2, it checks, whether the user is authenticated or not. If authenticated it can access the application2 else get redirected to first application for Authentication, And once authenticated again directly reaches the second application.

Continue reading